• SHOP
  • About
    • About Sara
    • Contact me!
    • Design Collaborations
    • Sewing Collaborations
  • Sewing
    • Sewing Tutorials
    • Things I Made
  • Design Portfolio
  • Blog
  • Nav Social Menu

    • Facebook
    • Instagram
    • Pinterest
Radiant Home Studio | Sewing Patterns & Surface Design

Radiant Home Studio

May 15, 2015 ·

Kantha Needle Book

Embroidery· Tutorials

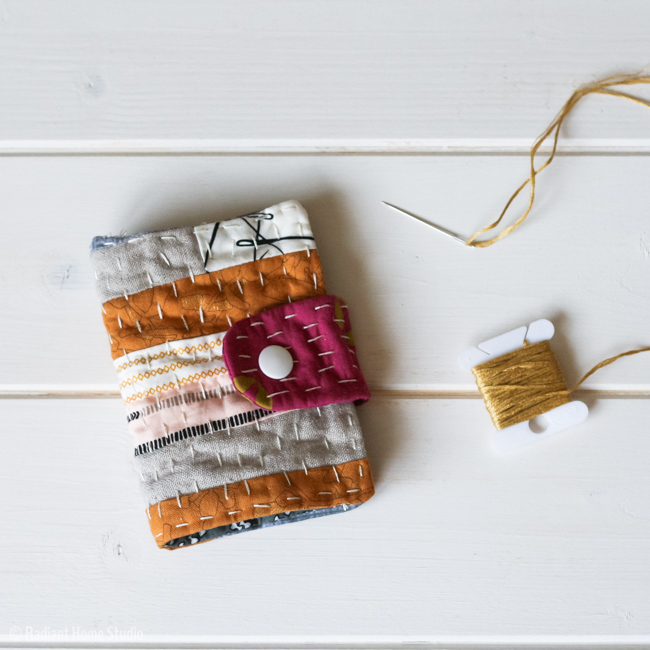
Sometimes I like a quick project that encourages “outside the box” thinking and inspires my creativity. This little Kantha inspired needle book did just that. Working without a pattern can be liberating and a project like this is hard to mess up. Straight lines aren’t necessary and the Kantha style stitching looks best if it is slightly uneven.

Kantha Needle Book Tutorial | Radiant Home Studio

I’m sharing a tutorial, but this still requires some improvisation on your part to make it work! It isn’t quite as detailed as some of my other tutorials, but the details you add to yours are what will make it your own. It’s the perfect way to use up scraps, practice improv quilting, and experiment with hand stitching!

Kantha Needle Book Tutorial | Radiant Home Studio

To Make a Kantha Needle Book You’ll Need:

• a few scraps of fabric, felt, and quilt batting
• embroidery needle and floss
• a snap or button

Instructions:

Note: I used 1/4″ seam allowances.

1. Cut fabric into several strips. My strips were about 1 1/2″ x 8″ and a little bit uneven (which is good for this project!). I also made some of my strips with 2 fabrics as you can see from the following photos.

Kantha Needle Book Tutorial | Radiant Home Studio

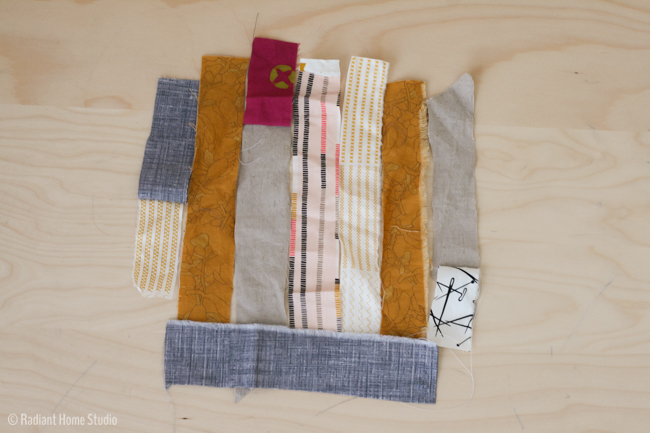
2. Stitch the strips together until you have a piece of fabric large enough to cut out a 5″ x 7″ rectangle.

Kantha Needle Book Tutorial | Radiant Home Studio

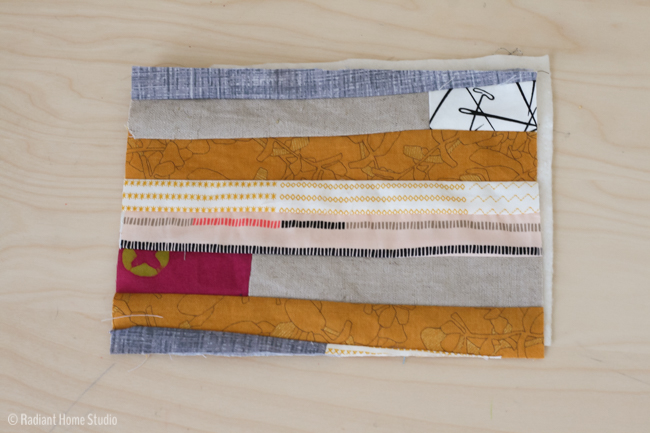
3. Cut out 5″ x 7″ rectangles from the patchwork fabric, a piece of quilt batting, and a piece of fabric for your lining.

4. Cut out two tab pieces. Mine are 3 1/2″ x 2″ with a rounded end. Cut out one more tab piece from batting.

Kantha Needle Book Tutorial | Radiant Home Studio

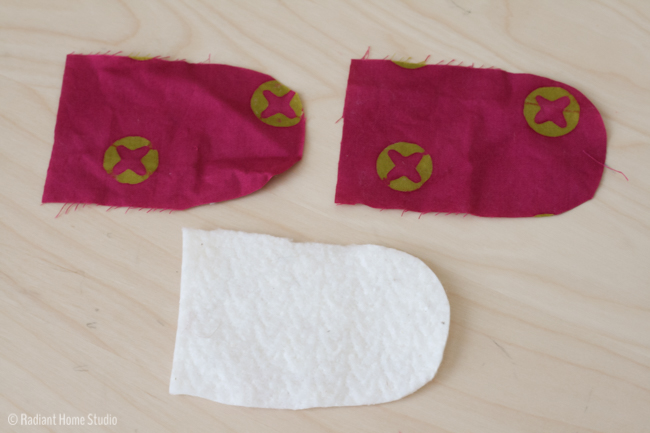
5. Layer the tab pieces as follows: batting, tab right side up, tab right side down. Stitch around the long curved edge and leave the short end open. Trim around the curve, turn right side out and press.

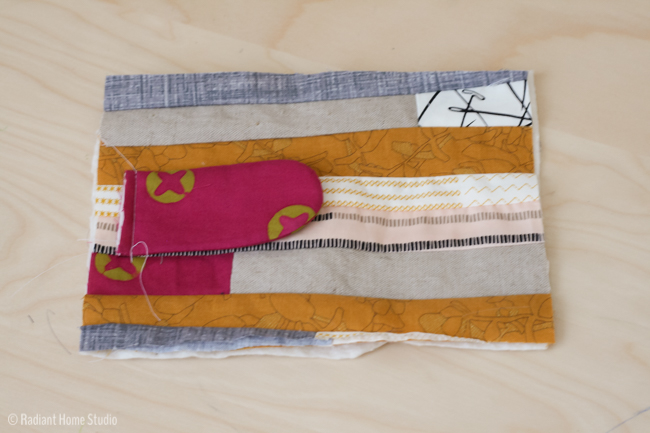
6. Place the tab piece on the patchwork rectangle and stitch it down as shown. Be sure to leave room for the seam allowance. Keep it folded toward the center and out of the way for the next step.

Kantha Needle Book Tutorial | Radiant Home Studio

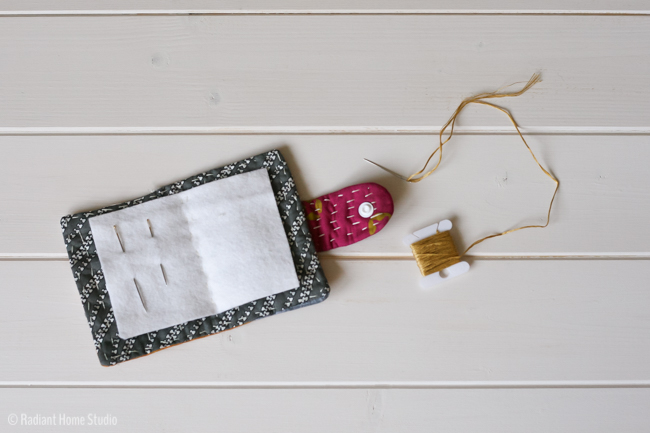
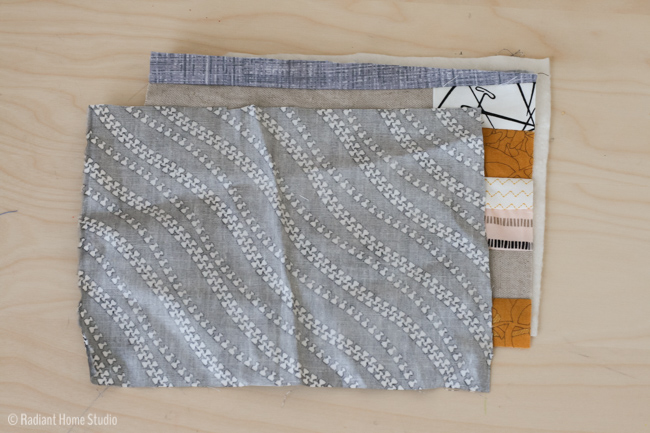
7. Layer the rectangles as follows: batting, patchwork rectangle right side up, lining rectangle right side down. Stitch around the rectangle leaving a 1-2″ opening on one side. Trim the seam allowances and corners. Turn right side out. Hand stitch the opening closed.

make a sewing needle book

8. Use a running stitch to stitch around the edges, tacking down the snap tab as you go. Fill in the rest of the space with running stitches. I used 2 strands of floss for mine. When you get to the middle, stitch a rectangle (or 2) of felt into the center crease. Add a button or snap.

Kantha Needle Book Tutorial | Radiant Home Studio

Kantha Needle Book Tutorial | Radiant Home Studio

Kantha Needle Book Tutorial | Radiant Home Studio

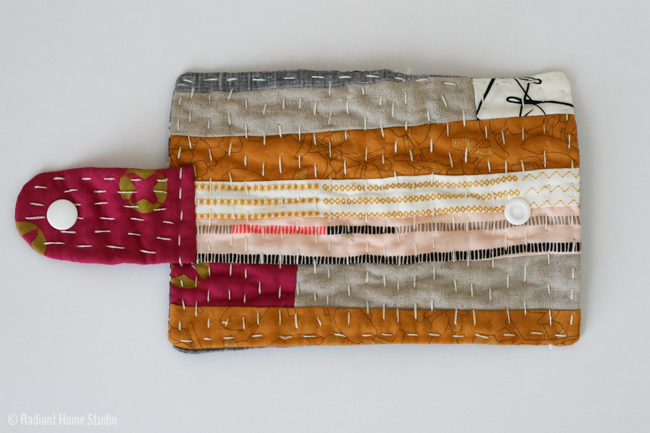
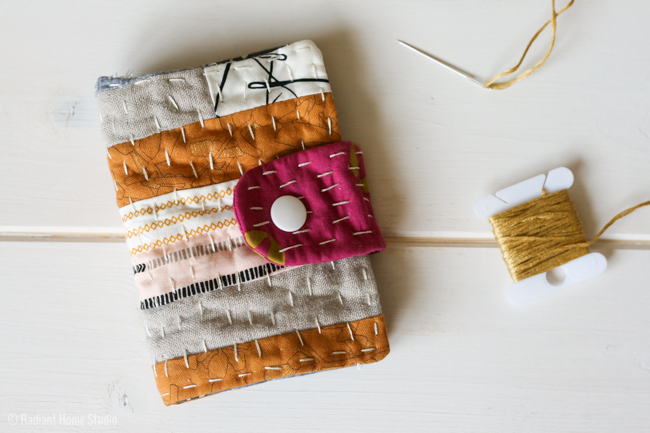
Just a quick tip for the running stitches…when you switch to a new row, Make the crossover stitch between the layers. That way you won’t have horizontal stitches on the back and vertical stitches on the front, and your lines will look neat and clean!

SaveSave

Previous Post: « Yet Another Noodlehead Divided Basket
Next Post: City Gym Shorts vs. Prefontaine Shorts »

Reader Interactions

Comments

  1. Cindy says

    May 15, 2015 at 7:30 am

    That is really neat Sara! Thank you for sharing the tutorial with us. 🙂

  2. vicky myers says

    May 15, 2015 at 7:30 am

    I love it – the fabric scraps are perfect. I could make hundreds with the amount of scraps I have! Woudl make great gifts too:)

  3. Rosemary @anitalianinmykitchen.com says

    May 17, 2015 at 11:42 am

    What a great idea, I would love to try making this, thanks.

    • Sara Curtis says

      May 19, 2015 at 7:34 am

      Thank you!

  4. Anne says

    June 11, 2015 at 10:11 am

    Beautiful!! I have a Craft Gossip post scheduled for later today that links to your tutorial:
    http://sewing.craftgossip.com/?p=82926
    –Anne

    • Sara Curtis says

      June 12, 2015 at 6:39 am

      Thank you Anne!

  5. Viviane Pfitzner says

    June 27, 2015 at 2:30 pm

    Thank you very much for this lovely tutorial, Sara. I made one straight away (from scraps, of course!)
    for a dear friend and loved how it turned out so decided I need one for myself as well! Thanks again! 🙂

    Viviane. X

    • Sara Curtis says

      June 27, 2015 at 3:02 pm

      Thanks so much for telling me Viviane! It’s always nice to know that my tutorials are being used 🙂

  6. Elisabet says

    July 6, 2015 at 3:11 am

    Beautiful! Thanks for sharing.

    • Sara Curtis says

      July 6, 2015 at 10:52 am

      Thank you!

  7. Shirley says

    December 6, 2015 at 3:00 am

    Great idea and so handy.

  8. Elaine Turnbull says

    October 20, 2016 at 1:06 am

    Thank you so much for this great tutorial … I am making one now, abd am very happy with the result.

    • Sara Curtis says

      October 23, 2016 at 3:17 pm

      Awesome! If you are on FB or IG and post it, tag me! I’d love to see what you made 🙂

Primary Sidebar

Hello

Welcome! I’m Sara. I share modern home & accessory sewing patterns, and I create surface designs for licensing. I hope you are encouraged to see beauty in small things and are inspired to try new creative projects!

Shop Sewing Patterns


icon icon

icon icon

Newsletter

Sign up to get access to free sewing patterns & resource library!

Find My Work at:


© Copyright Notice

All images and text copyright ©2013-2020 Radiant Home Studio, unless otherwise noted. Please be kind enough to link back to my site and contact me if you would like to use my images.

Disclosure

I am a participant in the Amazon Services LLC Associates Program, an affiliate advertising program designed to provide a means for me to earn fees by linking to Amazon.com and affiliated sites.

  • Disclosures & Copyright
  • About
  • Contact me!
  • Digital Pattern FAQ’s

Resources I Love:


Featured Posts:

  • How to Make A Waxed Canvas Gift Pouch | Radiant Home Studio

    How to Make a Waxed Canvas Gift Pouch

Sewing Tutorials

Denim Pocket with Grommets and Denim Shoulder Strap| Tote Bag Upgrade | Radiant Home Studio

Sewing Patterns

Surface Design

home page 1 - radiant home studio design
Sara Curtis | Stationery & Pattern Design

overflowandco

🪴Shop welcoming greeting cards, stationery, home goods, & gifts in NC
☕️ Cozy, fresh, encouraging design
💌 Email for wholesale, licensing & collabs👇🏻

I’ve been spending my creative energy gardening I’ve been spending my creative energy gardening this year. The previous owner planted gorgeous peonies that we get to enjoy every year. This year, the rain came at just the right time and they are thriving. #peonies #peoniesofinstagram #flowergarden #flowergardensofinstagram
I still have sewing patterns in my Etsy shop! The I still have sewing patterns in my Etsy shop! The potholder pattern always gets popular before the holidays because people love to make beautiful custom gifts for their friends and family. 

#sewersgonnasew #sewingproject #sewinggifts #diygifts #christmassewing #giftsforfriends #handmadegifts #handmadegiftsarethebest #etsyshop #sewingpattern
I’ve finished my Masters in Autism Studies! I’ I’ve finished my Masters in Autism Studies! I’m providing parent coaching, education and consultation services to families. If you know anyone that might benefit from my services, please send them my way! @autistickind
It’s been a while, but I’m taking my products It’s been a while, but I’m taking my products to a market in April! If you’re in the Triangle area, stop by 🌸Petals & Play: a Celebration of Neurodiversity on April 20th. #petalsandplaydurham @hopecreekacademy for more details…

#durhamevents #raleighnc #durhamnc #chapelhillnc #artisanmarket #stationeryshop
Stock up on encouraging greeting cards! 50% off ev Stock up on encouraging greeting cards! 50% off everything this week when you support my favorite nonprofit @hopecreekacademy 🙌

DM me for the code if you donate!

#givingtuesday2023 #giveback #shoplocal #shopsmall #shoplocaldurhamnc #shopsmallraleigh #stationeryshop #handmadegiftshop #coffeecard #friendshipgift #greetingcardshop
Grab a bunch of stocking stuffers for up to 50% of Grab a bunch of stocking stuffers for up to 50% off! This year I’m supporting @hopecreekacademy - a nonprofit school for neurodivergent students. This school has been a lifeline for our family this year and Eve been volunteering all we can to help them meet the needs of the students. When you donate to their fundraiser, l’ll send you a coupon code for 50% off your purchase of everything in my shop! 

#shopsmalldurham #shopsmallnc #shoplocalnc #stationeryshop #sewingpatternshop #washitapelove #washitapeshop #stockingstuffers #supportnonprofits #giveback #givingtuesday2023
Load More Follow on Instagram
  • Disclosures & Copyright
  • About
  • Contact me!
  • Digital Pattern FAQ’s

Copyright © 2025 · Sara Curtis // beloved theme