• SHOP
  • About
    • About Sara
    • Contact me!
    • Design Collaborations
    • Sewing Collaborations
  • Sewing
    • Sewing Tutorials
    • Things I Made
  • Design Portfolio
  • Blog
  • Nav Social Menu

    • Facebook
    • Instagram
    • Pinterest
Radiant Home Studio

Radiant Home Studio

August 21, 2015 ·

Professional Zipper Pocket Tutorial

Sewing· Tutorials

(it’s probably not the method you have been using!)

Do we really need another zipper pocket tutorial in the sewing blog world? A quick google search yields dozens of helpful results. So why am I adding my own version? Because most of the zipper pocket tutorials at the top of the search results are missing some steps!

Maybe the common methods people are using are meant to be easier, but I think that adding a couple of steps and a few minutes of time to get a professional looking zipper pocket is worth the extra bit of time and effort.

Professional Zipper Pocket Tutorial | Radiant Home Studio

The most common zipper pocket method I see is like Deby’s method at So Sew Easy. She uses the actual interior pocket piece to make a facing for the opening. This creates a clean edge around the zipper opening, but it also leaves the zipper tape exposed on the inside of the pocket. (See below.) I’ve seen plenty of store-bought items with zippers installed this way, so it isn’t necessarily wrong. But you want a truly professional zipper pocket, you can hide that zipper tape with just a couple of extra steps.

Professional Zipper Pocket Tutorial | Radiant Home Studio

The other zipper pocket method I see is like this one at Emmaline Bags. This method hides the zipper tape, but it’s is hard to get a nice clean edge around the opening. I usually end up with fraying fabric in the corners, which is not very pretty. The finished pocket is also less stable than a pocket with a facing.

This zipper pocket tutorial method combines these two techniques to create a clean and professional zipper pocket with no exposed zipper tape and added stability.

How to Sew a Professional Zipper Pocket:
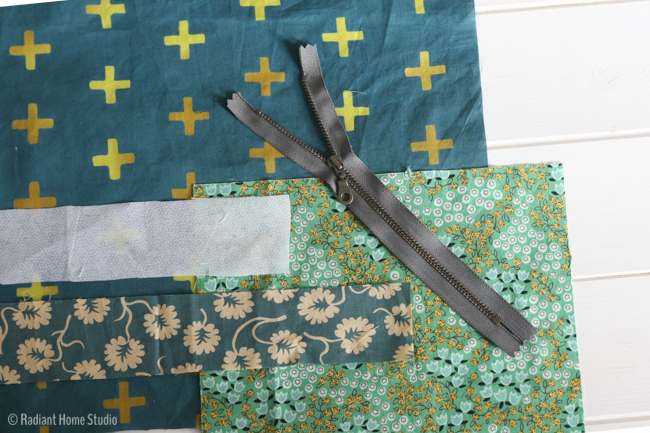
Materials:

• a bag lining or other project that needs a zipper pocket
• a zipper (I’m using a 9″ zipper for the example)
• a scrap of medium weight fusible interfacing
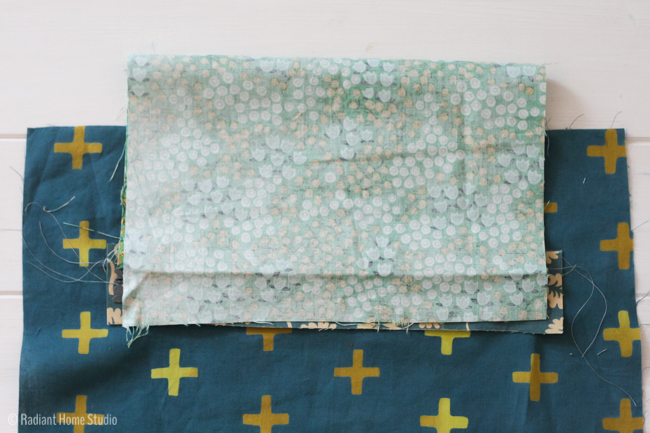
• 1/4 yd. pocket fabric (use a pattern piece or cut a rectangle 2″ wider than the zipper and twice as long as you want the pocket depth)
• a zipper foot

Professional Zipper Pocket Tutorial:

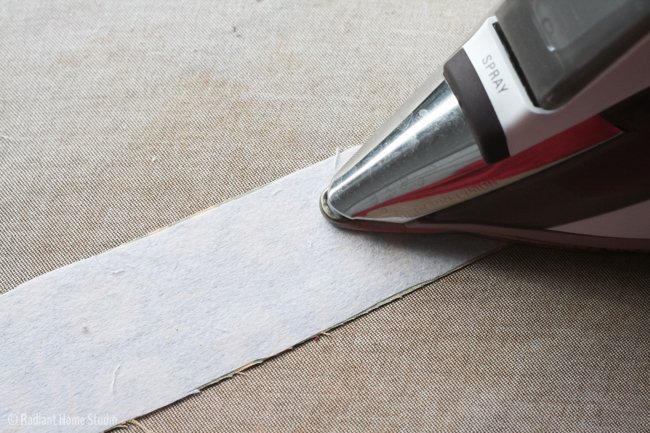
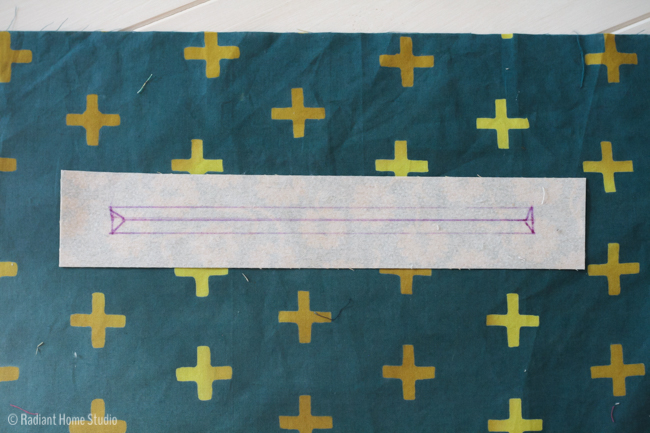
1. You’ll need your bag lining (or another project), a pocket piece, and a facing piece. Cut a rectangle from your fabric that is 2″ longer than your zipper and 2″ wide. (Mine is 11″ x 2″.) This is the pocket facing. Cut the same rectangle from interfacing and fuse it to the pocket facing piece.

Professional Zipper Pocket Tutorial | Radiant Home Studio zipper pocket tutorial-20

2. On the wrong side of the facing (on the interfacing), draw a line the length of your zipper teeth across the center.

Professional Zipper Pocket Tutorial | Radiant Home Studio

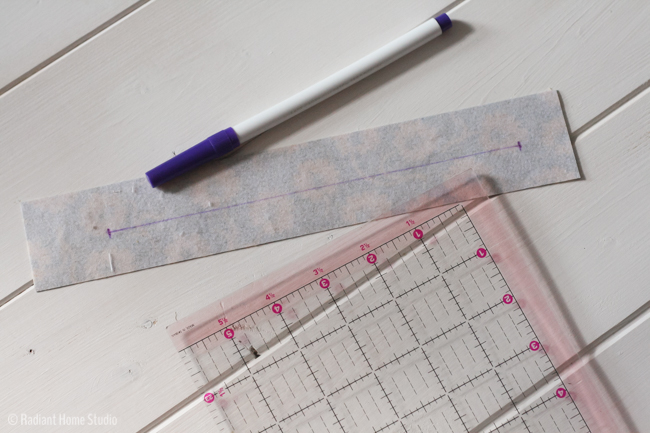
Draw two more lines, 1/4″ above and below the first line. Connect the ends to make a rectangle, and draw diagonal lines from the corner to the middle line.

Professional Zipper Pocket Tutorial | Radiant Home Studio

3. Place the pocket facing right sides together with the bag lining, centered over the place you want the zipper.

Professional Zipper Pocket Tutorial | Radiant Home Studio

Sew around the outer rectangle, using shorter stitches on the ends.

Professional Zipper Pocket Tutorial | Radiant Home Studio

4. Cut along the center line and into the corners at the diagonal lines.

Professional Zipper Pocket Tutorial | Radiant Home Studio

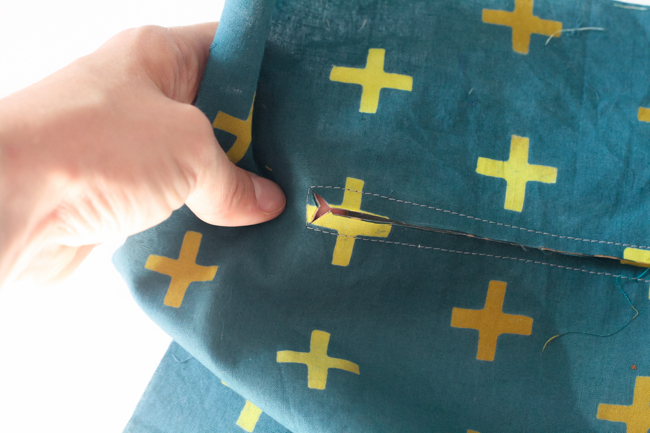
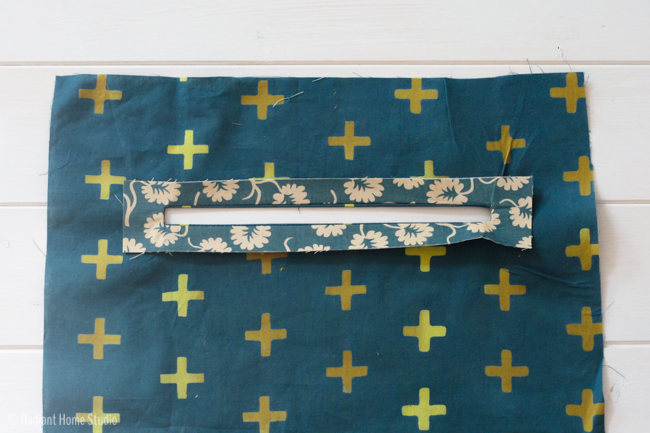
Push the facing through the hole and press flat.

Professional Zipper Pocket Tutorial | Radiant Home Studio

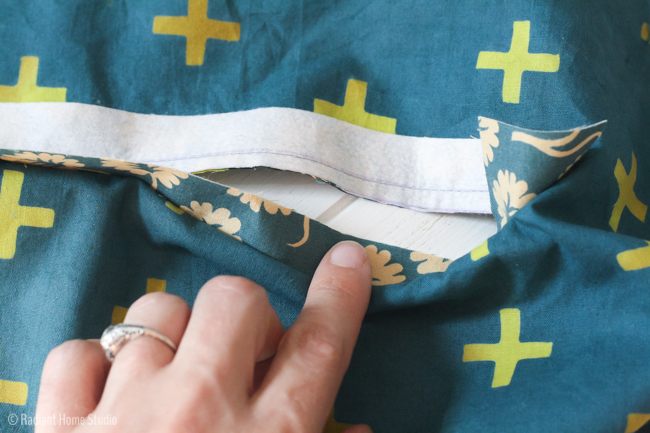
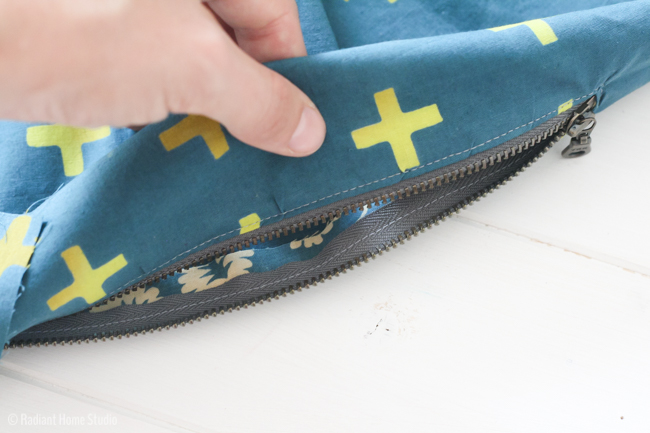
Below is the wrong side of the lining.

Professional Zipper Pocket Tutorial | Radiant Home Studio

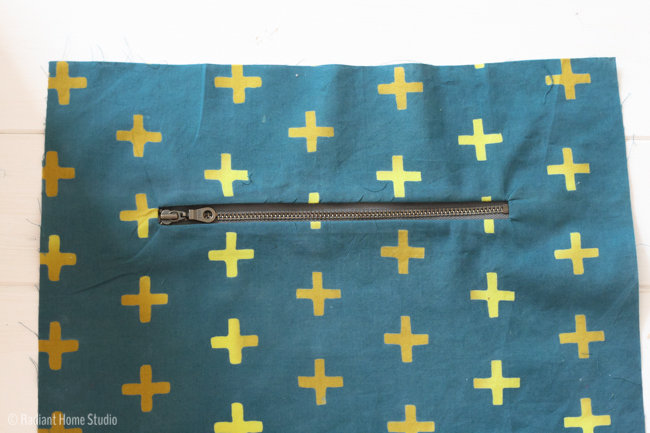
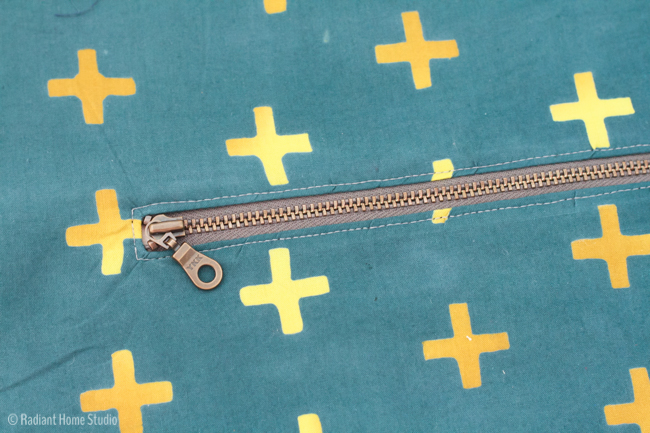
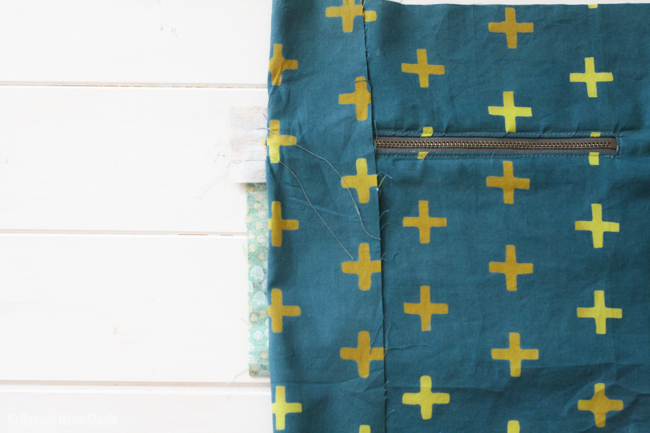
5. Align the opening over the zipper. Using your zipper foot, stitch around the edges of the opening. If you find that the zipper is slipping, you can try using fusible tape to keep it in place or a couple pieces of gift wrapping tape (which you can sew through and easily remove).

Professional Zipper Pocket Tutorial | Radiant Home Studio

Professional Zipper Pocket Tutorial | Radiant Home Studio

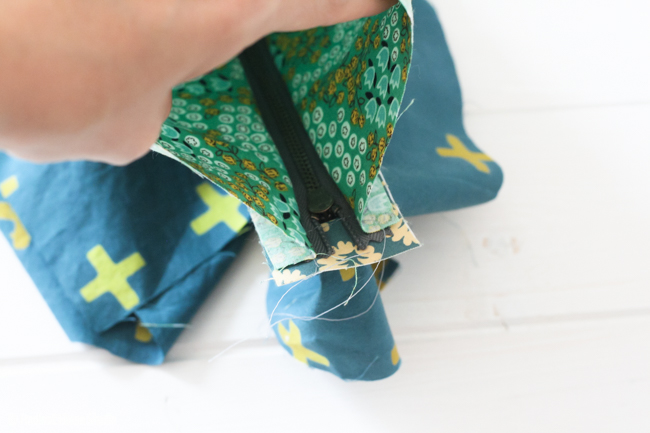
6. Align the wrong side of the upper zipper edge with the right side of the pocket piece. Fold the top of the bag lining out of the way. Stitch the upper edge of the zipper to one end of the pocket piece as close to the seam as possible. Make sure you are only sewing through the pocket piece, the zipper tape, and the facing piece.

Professional Zipper Pocket Tutorial | Radiant Home Studio

Professional Zipper Pocket Tutorial | Radiant Home Studio

Professional Zipper Pocket Tutorial | Radiant Home Studio

Professional Zipper Pocket Tutorial | Radiant Home Studio

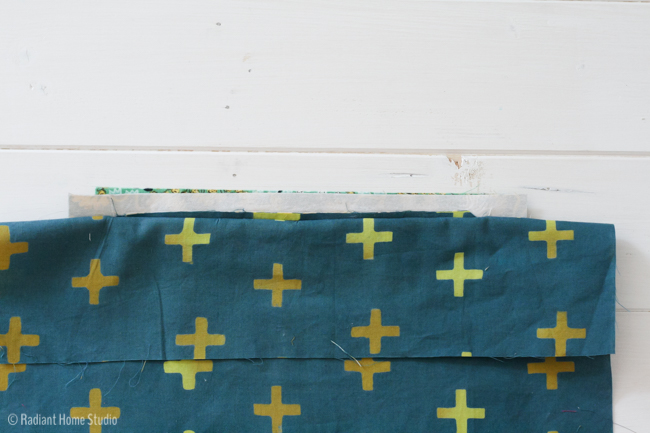
7. Take the other end of the pocket piece and align it with the bottom edge of the zipper. Fold the bottom of the bag lining out of the way, and stitch the pocket piece to the zipper as close to the seam as possible.

Professional Zipper Pocket Tutorial | Radiant Home Studio

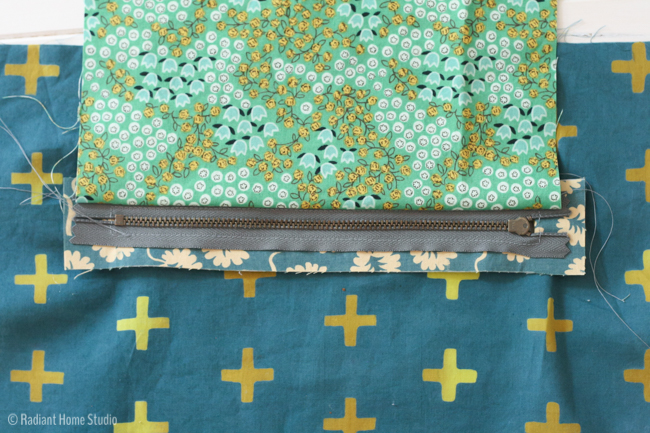
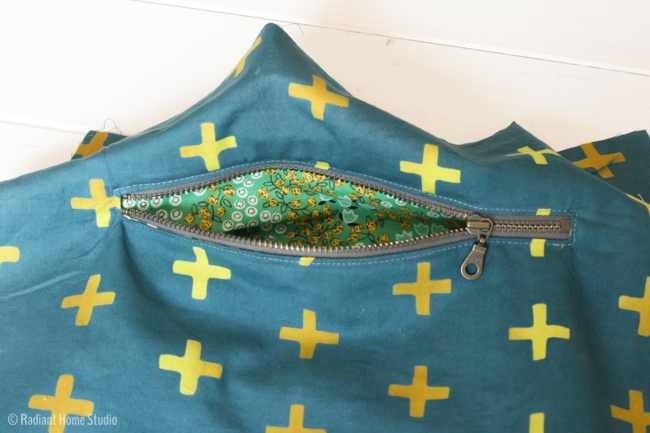
When you finish, it should look like this.

Professional Zipper Pocket Tutorial | Radiant Home Studio

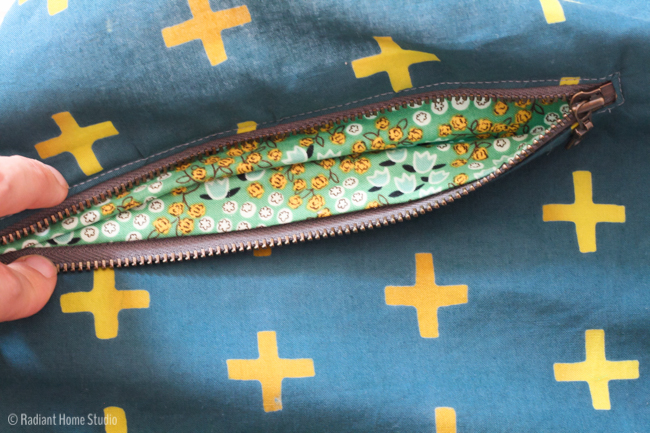
8. Press the pocket piece toward the bottom of the bag. Fold the sides of the bag lining out of the way. Stitch along the side of the pocket, from the top to the fold, catching the ends of the zipper tape in the stitching. Repeat for the other side. Trim the excess pocket fabric if needed.

Professional Zipper Pocket Tutorial | Radiant Home Studio

That’s it! See How nice the inside looks! You can use this zipper pocket method in place of the common methods included in your sewing patterns. I regularly toss aside zipper directions and install zippers using this process.

Professional Zipper Pocket Tutorial | Radiant Home Studio

Professional Zipper Pocket Tutorial | Radiant Home Studio

Professional Zipper Pocket Tutorial | Radiant Home Studio

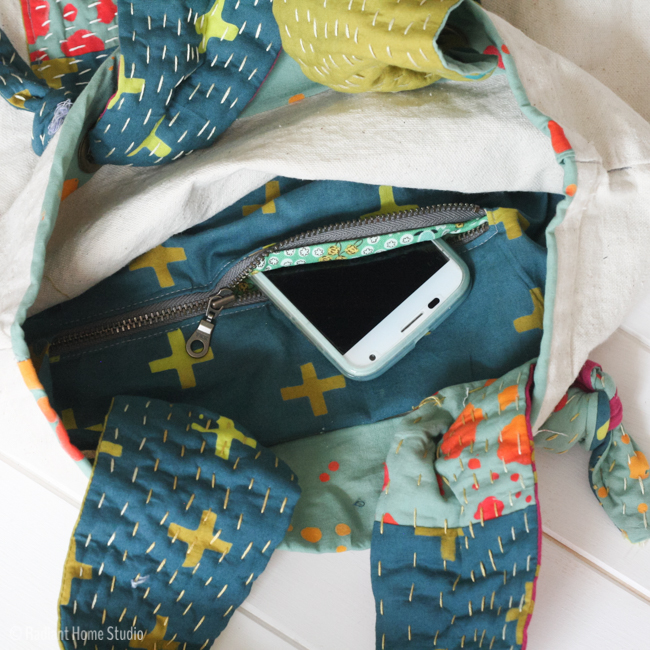
I’ve updated the Retro Rucksack pattern to include this type of zipper installation (and adding some other helpful tips!). If you have the original version of the pattern, you can use this tutorial to replace the interior zipper pocket directions included in the pattern.

What do you think of this method for sewing zipper pockets? Will you try it next time?

Previous Post: « Southport Dress
Next Post: Blue Ridge Dress Pattern Swap »

Reader Interactions

Comments

  1. JOY says

    August 22, 2015 at 9:59 am

    Great application. I like it because the zipper doesn’t have anything in the way to jam it up.

    • Sara Curtis says

      August 23, 2015 at 4:45 pm

      Thank you! Yes, it does slide nicely without getting jammed up.

  2. Stephanie says

    August 23, 2015 at 7:57 pm

    looks very pretty! A glue stick helps to keep zippers from slipping too.

    • Sara Curtis says

      August 24, 2015 at 1:53 pm

      Thanks! Yes, glue stick helps too!

  3. Kyema says

    August 23, 2015 at 9:25 pm

    You just blew my mind! This is incredible cool and really makes it look more professional. This is one of those things that I never even thought… “hey that could be done better.” Awesome tutorial. I’m pinning this to use it later! <3

    • Sara Curtis says

      August 24, 2015 at 10:16 am

      Thank you! What a nice compliment! Thanks for sharing it!

  4. Vicky myers says

    August 25, 2015 at 3:59 am

    Great idea, not seen this technique before – pinned:)

    • Sara Curtis says

      August 25, 2015 at 12:19 pm

      Thanks for sharing it Vicky!

  5. RobyGiup says

    August 27, 2015 at 6:37 am

    Very professional!
    Some years ago I attended a tailoring class where we learned how to make a tailored jacket (as part of a man formal suit) and we used the same technique to create the front pockets 🙂

    • Sara Curtis says

      August 27, 2015 at 12:17 pm

      Yes, another person mentioned that they use this technique for welt pockets too. It looks very nice on tailored items as well!

  6. Deby at So Sew Easy says

    September 9, 2015 at 12:26 am

    I am so delighted to see this. It’s been something I’ve been meaning to work on and then never got round to it. I knew there had to be a better way. You are a star!

    • Sara Curtis says

      September 9, 2015 at 8:08 am

      Thanks Deby! It’s certainly not a new technique, but it’s not a method that is widely shared by bloggers. Maybe people are trying to keep it simple, but I know I’m not the only one that likes to hide those zipper edges!

  7. nana says

    December 3, 2015 at 4:42 am

    سلام سارای عزیز
    سایت شما فوق العاده است و برای من بسیار الهام بخش است
    متشکرم

    • Sara Curtis says

      December 3, 2015 at 7:56 am

      Thank you!

  8. Nancy R says

    January 20, 2016 at 10:13 am

    Hi Sara – love your expertise at sewing and photography. Would love to see a tutorial about replacing a side-seam, winter coat pocket.

    • Sara Curtis says

      January 20, 2016 at 11:01 am

      Thank you for the idea! If I happen to have a coat pocket that needs replacing, then I’ll definitely post a tutorial. If you have a picture of a particular problem with your coat, feel free to email it to me. Usually, you can examine the way it’s put together, take out the part that’s not working, trace replacement pieces, and try to sew them back in the way you removed them. Sometimes that requires taking out a couple more seams to get to the areas you need and then sewing them back at the end.

  9. Carol G says

    March 10, 2016 at 5:05 am

    Thank you Sara for coming up with this idea! I’ve tried both methods you described and always use Deby’s method but don’t like the visible edges of the zipper tape. It never occurred to me that there was a way to cover that up. What a smart cookie you are!! I’ll try your method next time but already know that I’ll use it from now on.

    I found your site because I’ve been looking for ideas on how to add an external zipper on a bag that needs interfacing like fusible pellon such as H630 and can’t find any clues. All the sites say to use interfacing like SF101 which I do and it’s great on med/heavy fabric but not enough interfacing on quilting fabrics. I guess I will just have to use a sew in along with SF101 throughout.

    Thanks again
    Carol

    • Sara Curtis says

      March 10, 2016 at 7:35 am

      Thank you! I can’t take credit for the idea. I can’t remember where I first saw it or how I figured it out, but I know other sewists use a similar method. In fact I saw a similar technique in “The Better Bag Maker” when I was browsing it yesterday.

      I haven’t used many of the thicker interfacings, but I don’t see why you wouldn’t be able to make this type of pocket work. I’d suggest cutting the facing piece a little larger. You might also have to do more clipping around the seam allowance.

  10. Geri says

    April 10, 2016 at 8:07 am

    I have just tried your technique but have found that the fabric tends to crease a bit in the corner after pushing the facing inside. Any way to avoid that?

    • Sara Curtis says

      April 10, 2016 at 8:18 am

      Yes! Usually that happens when you haven’t clipped in to the corner as far as you can.See if you can clip into the corner a few more threads. You can also make a couple more cuts about a 1/4 in. away from the corner to give it a little more ease. Usually between that and some steam, you can get it to lay flat!

  11. Cee Jay says

    June 26, 2016 at 5:29 am

    Hello

    This looks and reads like ‘the’ best internal zip pocket tutorial I have seen and read and I’ve seen and read lots. I’ve bookmarked it for future reference (you should do a PDF for easy download) and I will practice this on scrap fabric.

    Thank you for your time in doing this tutorial.

    With blessngs.

    Cee Jay.

    • Sara Curtis says

      July 3, 2016 at 9:39 pm

      Thank you so much!

  12. Aaron says

    December 30, 2016 at 9:41 pm

    This is a very impressive sewing tutorial which seems to be a rare find on the internets.

    The explanations and photos are laid out perfectly making it easy to follow and understand both the why and how of the steps.

    Thank you very much for putting your time and care into this 🙂

Primary Sidebar

Hello

Welcome! I’m Sara. I share modern home & accessory sewing patterns, and I create surface designs for licensing. I hope you are encouraged to see beauty in small things and are inspired to try new creative projects!

Shop Sewing Patterns


icon icon

icon icon

Newsletter

Sign up to get access to free sewing patterns & resource library!

Find My Work at:


© Copyright Notice

All images and text copyright ©2013-2020 Radiant Home Studio, unless otherwise noted. Please be kind enough to link back to my site and contact me if you would like to use my images.

Disclosure

I am a participant in the Amazon Services LLC Associates Program, an affiliate advertising program designed to provide a means for me to earn fees by linking to Amazon.com and affiliated sites.

Footer

Sign up to get access to free sewing patterns & resource library!

On my artboard today. I’m not sure if I’ll sti On my artboard today. I’m not sure if I’ll stick with these colors. Maybe one like this and one without the background leaves and funkier colors? I like to recolor flowers with non-traditional color palettes. 🤷🏻‍♀️

I also shared a few favorites to follow this week in my stories!

#surfacepatterndesign #immersion2021 #floralpattern #wallpaperdesign #beddingdesign #surfacepatterndesigner #surfacepatterncommunity #fridayflorals #wildflowerdesigns
Favorite Adobe Illustrator tool? I love recoloring Favorite Adobe Illustrator tool? I love recoloring patterns. I probably spend way too much time with the recolor tool and not enough time making new patterns. 🤷🏻‍♀️

Last day to join the Immersion Course! If you have ever dreamed of making beautiful designs, Bonnie can teach you how to get what’s in your head into the computer and then how to make money from licensing your designs to companies for use on products. 

As a member of Bonnie’s support team, I’ll be there to make sure you don’t feel lost. There’s room for you...as Bonnie often reminds us!

#surfacepatterndesign #surfacepatterndesigner #surfacepatterncommunity #printandpattern #radianthomestudiopatterns #floralpattern #alltheflowers #artlicensing #flowersfordays #mutedflorals
Look what just came in the mail! Notebooks! This w Look what just came in the mail! Notebooks! This was a test batch to check quality and I’m thoroughly impressed.

I’ll be listing extra in the shop soon, but first dibs go to anyone that signs up for the Immersion Course using my link. I’ll be sending a small gift package and scheduling a course success/ coaching call with you!

Just a reminder that the last day to enroll in Immersion is tomorrow! If you are like me and overthink things until the last day, you are not alone. 

I know it’s a huge decision. I have an Immersion stories highlight if you want to know more or go to my profile to find a link to the info page. Message me all your questions! 

#immersioncourse #immersioncourse2021 #designernotebooks #learntodesign #learnillustrator #surfacepatterndesigner
Just got an order of stickers in! I’m debating a Just got an order of stickers in! I’m debating about putting them in the shop as a separate product or adding them to orders. I think I need a few more to make a pretty coordinating set! 🌹

Reminder: there’s still a couple more days to enroll in the Surface Pattern Design Immersion Course or the free mini-course from Bonnie! Links in my profile...as always. Keep messaging with questions! ☺️
It’s been a minute since I showed my face here! It’s been a minute since I showed my face here! ☺️

I wanted to get a little personal today. If you’re here for sewing & crafty stuff...stay tuned. I’m not abandoning you. 🙂 If you saw my stories last week, you may have learned that I’m deep in design mode for a few weeks, working with @bonniechristine on the Surface Pattern Design Immersion Course.

When I discovered Spoonflower (about 8 years ago!) and realized I could create my own fabric, I had this far off “maybe someday” dream to create a collection of designs for a fabric company.

I spent many years learning bits and pieces of design and business skills. But a couple of years ago I got more serious about making my dream a reality. 

Last year, I made an investment in myself and I joined the Immersion Course with Bonnie Christine. It was truly the community support and confidence that I gained that propelled me forward this year. Just a few weeks after Immersion ended I signed a licensing deal for children’s wall art with Oopsy Daisy and a few months after that...I signed a contract with a fabric company!

You guys...Bonnie is SO genuine and generous in everything she does. ❤️ It spills over into this beautiful and inspiring community that cheers each other on every step of the way. 

This year, Bonnie invited me to join her support team to help encourage new students through the course and provide technical support for all those tricky Illustrator issues. 🙌🏻

This course is for anyone that wants to invest in their creative career. My “wildest dream” came true this year. I’m actually feeling a bit lost right now because I need a bigger dream!

Whether you have a few years of experience like I did when I joined or you have never used design software...Bonnie will walk you through the ENTIRE process. This is like a college-level course on design and creative business. We have many older students starting a second career, people that just graduated design school but don’t know how to practically start an art-based business, and people from dozens of countries around the world. It’s a beautiful, diverse community filled with people taking steps toward their creative business goals.

More below...
We had our first day of fake spring yesterday. It We had our first day of fake spring yesterday. It was warm for one day and it’s back to being cold. 🤷🏻‍♀️

I always draw flowers anyway. I’m hoping some of the local botanical gardens open back up this year. We have some really great inspiration nearby and flowers will start blooming soon!

It’s the little bits of beauty that inspire me the most. What are you looking forward to this Spring?
Just a reminder that I have this heart garland tut Just a reminder that I have this heart garland tutorial linked in my profile if you want to make some happy Valentine’s decor this week.

My girls are origami experts, so we worked together on these video tutorials last year. It’s a good family project for older kids! 💕

#heartcrafts #valentinesdecor #valentinecrafts #mycolorfulhome #cozymodernvibe #diyvalentinesdecor
This another favorite pattern of mine. As my style This another favorite pattern of mine. As my style has developed, I’ve embraced the imperfect lines and tend to work with graphic, but organic shapes. I like unexpected little pops of color or shapes that emerge from layering.

My iPad is at the fix-it shop, so of course, I’m feeling inspired today. ☺️ Maybe I should try some actual sketching and planning on paper with a pencil...😜

#radianthomestudiodesign #fabricdesign #surfacepatterndesign #surfacepatterncommunity #surfacepatternlife #licensingartist #artlicensing
Follow on Instagram
  • Disclosures & Copyright
  • About
  • Contact me!
  • Digital Pattern FAQ’s

Copyright © 2021 · Sara Curtis // beloved theme