• SHOP
  • About
    • About Sara
    • Contact me!
    • Design Collaborations
    • Sewing Collaborations
  • Sewing
    • Sewing Tutorials
    • Things I Made
  • Design Portfolio
  • Blog
  • Nav Social Menu

    • Facebook
    • Instagram
    • Pinterest
Radiant Home Studio

Radiant Home Studio

August 18, 2014 ·

Foundation Paper Piecing Using the Tessellation Quilt Pattern

Sewing· Sewing Tips· Tutorials

As much as I sew, I haven’t done much quilting over the years. I made a simple baby quilt for my daughter and pieced some duvet covers for the kids’ beds. They were simple block patterns, but I did not enjoy the picky cutting and it drove me crazy that I couldn’t get the corners to meet perfectly.

A few weeks ago, when Sara at SewSweetness announced the Tessellation Quilt Sew-along (pattern by Alison Glass), I could not stop looking at the pattern cover and Alison’s website. I decided to try quilting again and I am so happy that I did. English paper piecing seems to be popular right now so I’ve seen many tutorials for hand pieced projects, but I’ve never heard of foundation paper piecing. I wonder how many other people that are scared of quilting would find this technique easier and more accurate.

Tessellation Quilt Block | Foundation Paper Piecing | Radiant Home Studio

Basically, you line up your fabric on the paper, sew right on the paper and through the fabric, following the printed line. You don’t have to worry about seam allowances or precise cutting because you trim the block after each seam and around the edges after the block is completed. I find it to be much more enjoyable! I can go make a couple of blocks when I have a few minutes without thinking too hard about what step I’m on or calculating block sizes to cut.

Tessellation Quilt Block | Foundation Paper Piecing | Radiant Home Studio

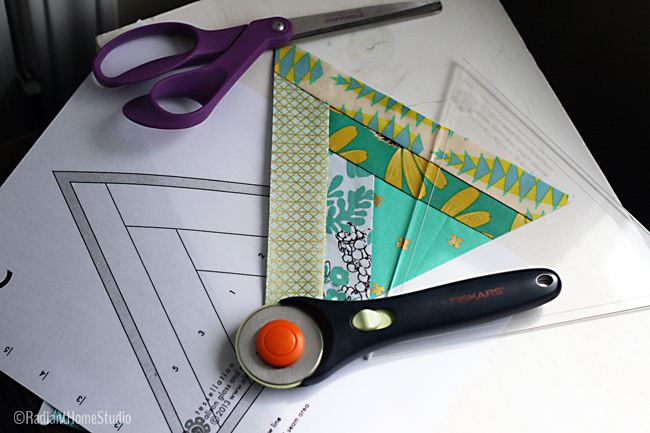
The fabrics I have used for this block are Cotton & Steel basics mixed with some Anna Maria Horner Dowry and Pretty Potent.

I’m going to walk you through one of the “C” blocks from the Tessellation Quilt to show you how to do foundation paper piecing.

Foundation Paper Piecing Tutorial:

1) Cut out the block (a triangle in this case) and cut out enough fabric pieces to cover each section of the block, including enough to cover the seam allowances. Alison’s pattern has suggested sizes for these. I found that trying to conserve fabric results in frustration, so go ahead and be generous with these cuts.

Tessellation Quilt Block | Foundation Paper Piecing | Radiant Home Studio

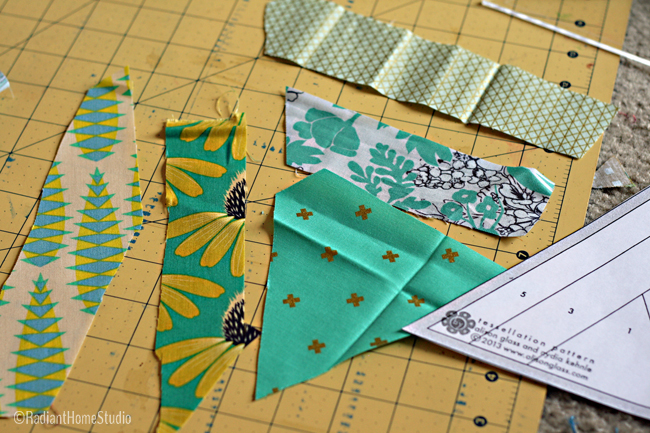
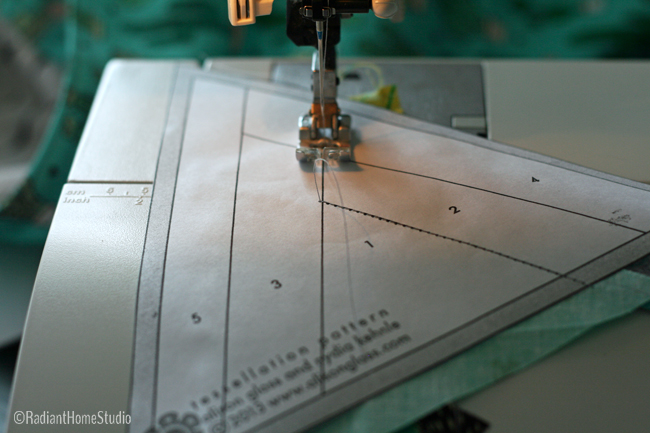
2) On the back side of the paper block, place the #1 fabric face up covering the whole #1 section. (You can hold it up to a window or light source to make sure the whole area is covered.) Place the #2 fabric right side down on overlapping the seam line between the #1 and #2 blocks. You can fold it back quickly to check that it will cover the whole #2 section.

Tessellation Quilt Block | Foundation Paper Piecing | Radiant Home Studio

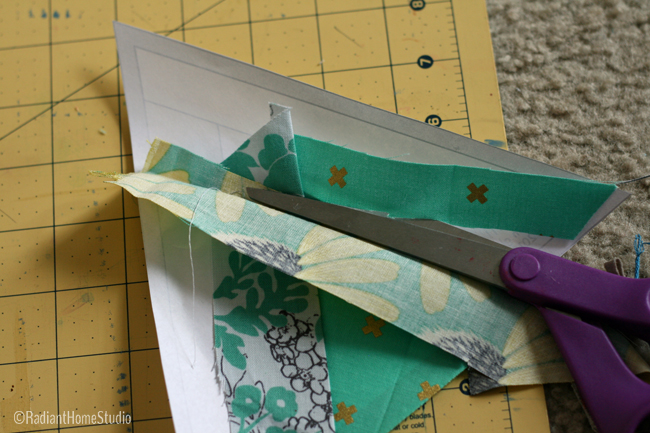
3) Hold the pieces in place, turn it over, and stitch along the seam line between the #1 and #2 sections. For this block, it is fine if the stitching line extends beyond the ends because it will be caught up in the next seam.

Tessellation Quilt Block | Foundation Paper Piecing | Radiant Home Studio

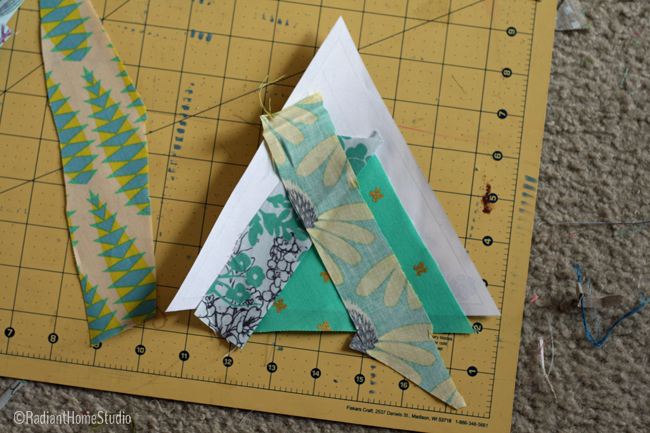
4) Trim the seam allowance. It’s much easier to do this after each seam. Once the seam allowance is folded down into the next seam, it’s very difficult to trim. Get rid of the bulk while you can.

Tessellation Quilt Block | Foundation Paper Piecing | Radiant Home Studio

5) Press the seam open. It’s best to do this after each seam as well to keep from getting wrinkles and puckers, so keep the ironing board close.

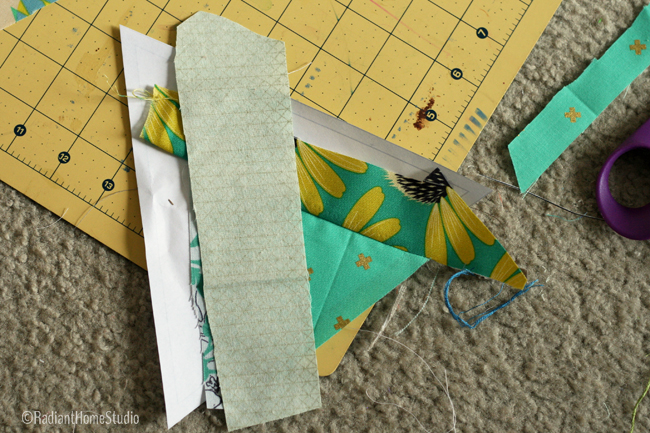
6) Hold up the block to your light source again and place the #3 fabric right side down overlapping the seam that runs along the #1 and #2 sections. Fold it back quickly to make sure it is covering the entire #3 section. With right sides together, stitch on the paper line.

Tessellation Quilt Block | Foundation Paper Piecing | Radiant Home Studio

7) Trim the seams and press again.

Tessellation Quilt Block | Foundation Paper Piecing | Radiant Home Studio

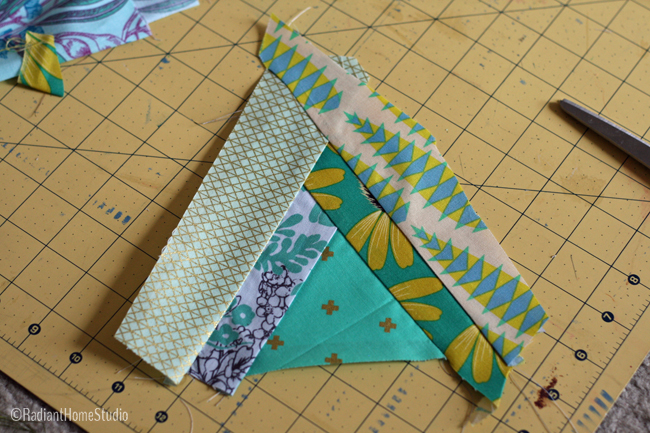
8) Line up the #4 fabric. Check the placement with your light source, turn it over and stitch along the #4 seam line.

Tessellation Quilt Block | Foundation Paper Piecing | Radiant Home Studio

Trim and press.

Tessellation Quilt Block | Foundation Paper Piecing | Radiant Home Studio

9) Line up the #5 fabric the same as the others and stitch along the #5 seam line. Trim and press.

Tessellation Quilt Block | Foundation Paper Piecing | Radiant Home Studio

10) Turn the block over to the paper side and trim the edges using your rotary cutter. For this particular pattern, you can get a clear cutting template to make the cutting quick and accurate.

Tessellation Quilt Block | Foundation Paper Piecing | Radiant Home Studio

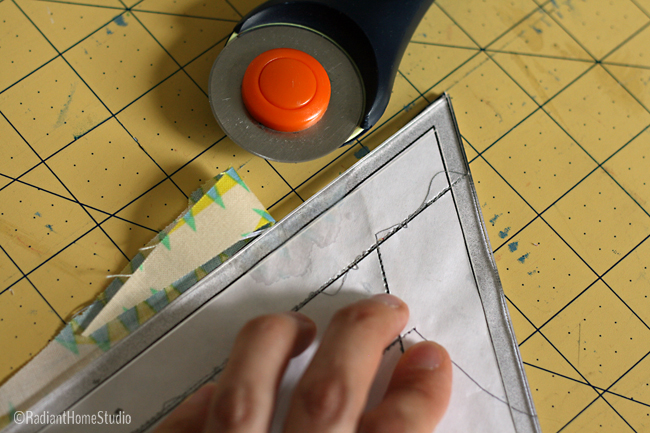
Alison recommends leaving the paper attached to the block and removing them as you join the blocks. The seam allowance is clearly marked on this one and you can use it to join the blocks accurately as well.

Tessellation Quilt Block | Foundation Paper Piecing | Radiant Home Studio

Do you use this method for quilting? Do you think it is easier?

Previous Post: « Embroider Over A Fabric Design
Next Post: Introducing the Coastal Tote Pattern! »

Reader Interactions

Comments

  1. Megan says

    August 24, 2014 at 10:07 am

    I’ve been thinking about learning how to do paper piecing for a while now….so far the only quilts I’ve made have been big blocks (baby quilts) and a crazy quilt (not even close to being finished). This looks like it would be easier for me than the traditional method. Are there free printables out there in internet world for paper piecing? Just to get started and see if this is the right method for me. Your explanation made so much sense and I’m glad I found your blog today!

    • Sara Curtis says

      August 25, 2014 at 7:32 am

      I haven’t really gone searching for other patterns yet, but my first stop would be craftsy. You can search and sort through the free patterns!

Primary Sidebar

Hello

Welcome! I’m Sara. I share modern home & accessory sewing patterns, and I create surface designs for licensing. I hope you are encouraged to see beauty in small things and are inspired to try new creative projects!

Shop Sewing Patterns


icon icon

icon icon

Newsletter

Sign up to get access to free sewing patterns & resource library!

Find My Work at:


© Copyright Notice

All images and text copyright ©2013-2020 Radiant Home Studio, unless otherwise noted. Please be kind enough to link back to my site and contact me if you would like to use my images.

Disclosure

I am a participant in the Amazon Services LLC Associates Program, an affiliate advertising program designed to provide a means for me to earn fees by linking to Amazon.com and affiliated sites.

Footer

Sign up to get access to free sewing patterns & resource library!

On my artboard today. I’m not sure if I’ll sti On my artboard today. I’m not sure if I’ll stick with these colors. Maybe one like this and one without the background leaves and funkier colors? I like to recolor flowers with non-traditional color palettes. 🤷🏻‍♀️

I also shared a few favorites to follow this week in my stories!

#surfacepatterndesign #immersion2021 #floralpattern #wallpaperdesign #beddingdesign #surfacepatterndesigner #surfacepatterncommunity #fridayflorals #wildflowerdesigns
Favorite Adobe Illustrator tool? I love recoloring Favorite Adobe Illustrator tool? I love recoloring patterns. I probably spend way too much time with the recolor tool and not enough time making new patterns. 🤷🏻‍♀️

Last day to join the Immersion Course! If you have ever dreamed of making beautiful designs, Bonnie can teach you how to get what’s in your head into the computer and then how to make money from licensing your designs to companies for use on products. 

As a member of Bonnie’s support team, I’ll be there to make sure you don’t feel lost. There’s room for you...as Bonnie often reminds us!

#surfacepatterndesign #surfacepatterndesigner #surfacepatterncommunity #printandpattern #radianthomestudiopatterns #floralpattern #alltheflowers #artlicensing #flowersfordays #mutedflorals
Look what just came in the mail! Notebooks! This w Look what just came in the mail! Notebooks! This was a test batch to check quality and I’m thoroughly impressed.

I’ll be listing extra in the shop soon, but first dibs go to anyone that signs up for the Immersion Course using my link. I’ll be sending a small gift package and scheduling a course success/ coaching call with you!

Just a reminder that the last day to enroll in Immersion is tomorrow! If you are like me and overthink things until the last day, you are not alone. 

I know it’s a huge decision. I have an Immersion stories highlight if you want to know more or go to my profile to find a link to the info page. Message me all your questions! 

#immersioncourse #immersioncourse2021 #designernotebooks #learntodesign #learnillustrator #surfacepatterndesigner
Just got an order of stickers in! I’m debating a Just got an order of stickers in! I’m debating about putting them in the shop as a separate product or adding them to orders. I think I need a few more to make a pretty coordinating set! 🌹

Reminder: there’s still a couple more days to enroll in the Surface Pattern Design Immersion Course or the free mini-course from Bonnie! Links in my profile...as always. Keep messaging with questions! ☺️
It’s been a minute since I showed my face here! It’s been a minute since I showed my face here! ☺️

I wanted to get a little personal today. If you’re here for sewing & crafty stuff...stay tuned. I’m not abandoning you. 🙂 If you saw my stories last week, you may have learned that I’m deep in design mode for a few weeks, working with @bonniechristine on the Surface Pattern Design Immersion Course.

When I discovered Spoonflower (about 8 years ago!) and realized I could create my own fabric, I had this far off “maybe someday” dream to create a collection of designs for a fabric company.

I spent many years learning bits and pieces of design and business skills. But a couple of years ago I got more serious about making my dream a reality. 

Last year, I made an investment in myself and I joined the Immersion Course with Bonnie Christine. It was truly the community support and confidence that I gained that propelled me forward this year. Just a few weeks after Immersion ended I signed a licensing deal for children’s wall art with Oopsy Daisy and a few months after that...I signed a contract with a fabric company!

You guys...Bonnie is SO genuine and generous in everything she does. ❤️ It spills over into this beautiful and inspiring community that cheers each other on every step of the way. 

This year, Bonnie invited me to join her support team to help encourage new students through the course and provide technical support for all those tricky Illustrator issues. 🙌🏻

This course is for anyone that wants to invest in their creative career. My “wildest dream” came true this year. I’m actually feeling a bit lost right now because I need a bigger dream!

Whether you have a few years of experience like I did when I joined or you have never used design software...Bonnie will walk you through the ENTIRE process. This is like a college-level course on design and creative business. We have many older students starting a second career, people that just graduated design school but don’t know how to practically start an art-based business, and people from dozens of countries around the world. It’s a beautiful, diverse community filled with people taking steps toward their creative business goals.

More below...
We had our first day of fake spring yesterday. It We had our first day of fake spring yesterday. It was warm for one day and it’s back to being cold. 🤷🏻‍♀️

I always draw flowers anyway. I’m hoping some of the local botanical gardens open back up this year. We have some really great inspiration nearby and flowers will start blooming soon!

It’s the little bits of beauty that inspire me the most. What are you looking forward to this Spring?
Just a reminder that I have this heart garland tut Just a reminder that I have this heart garland tutorial linked in my profile if you want to make some happy Valentine’s decor this week.

My girls are origami experts, so we worked together on these video tutorials last year. It’s a good family project for older kids! 💕

#heartcrafts #valentinesdecor #valentinecrafts #mycolorfulhome #cozymodernvibe #diyvalentinesdecor
This another favorite pattern of mine. As my style This another favorite pattern of mine. As my style has developed, I’ve embraced the imperfect lines and tend to work with graphic, but organic shapes. I like unexpected little pops of color or shapes that emerge from layering.

My iPad is at the fix-it shop, so of course, I’m feeling inspired today. ☺️ Maybe I should try some actual sketching and planning on paper with a pencil...😜

#radianthomestudiodesign #fabricdesign #surfacepatterndesign #surfacepatterncommunity #surfacepatternlife #licensingartist #artlicensing
Follow on Instagram
  • Disclosures & Copyright
  • About
  • Contact me!
  • Digital Pattern FAQ’s

Copyright © 2021 · Sara Curtis // beloved theme