• SHOP
  • About
    • About Sara
    • Contact me!
    • Design Collaborations
    • Sewing Collaborations
  • Sewing
    • Sewing Tutorials
    • Things I Made
  • Design Portfolio
  • Blog
  • Nav Social Menu

    • Facebook
    • Instagram
    • Pinterest
Radiant Home Studio

Radiant Home Studio

December 15, 2014 ·

Printed & Stitched Handmade Gift Bags

Holidays· Sewing· Tutorials

I love kraft paper bags! I bought some last week with plans to decorate them, though I didn’t have anything specific in mind. I like white stamped designs on brown kraft paper, but I wanted to add some details that would make my design unique. There’s no point in taking the time to write a tutorial for something that has been done over and over.

But, did you know you can sew on paper? Or paper bags, in this case? When I’m teaching my kids to sew, paper is the first thing I have them sew on. It’s cheap and doesn’t slide around like fabric. Anyway, I mixed a simple white stamp with some free motion stitching on paper to make these pretty handmade gift bags…

Printed & Stitched Handmade Gift Bag | Radiant Home Studio

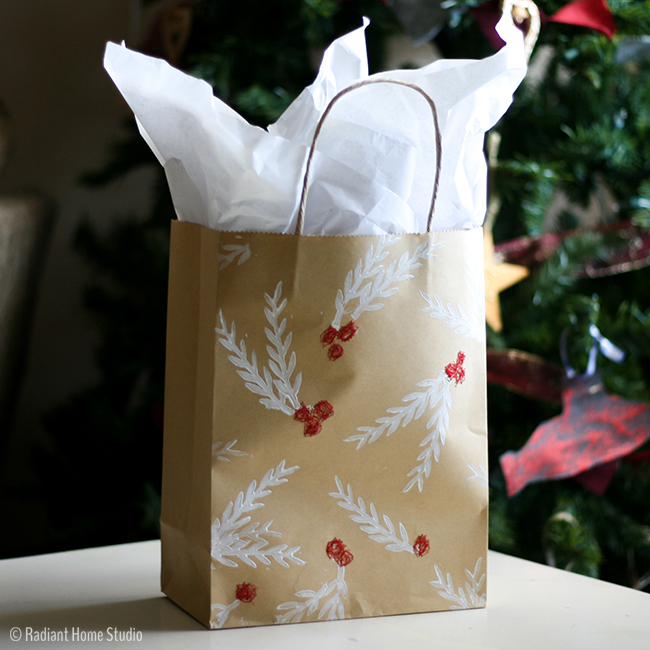
Let me show you how to make your own stamped and stitched bags. You can use my berries and branches idea or make your own design.

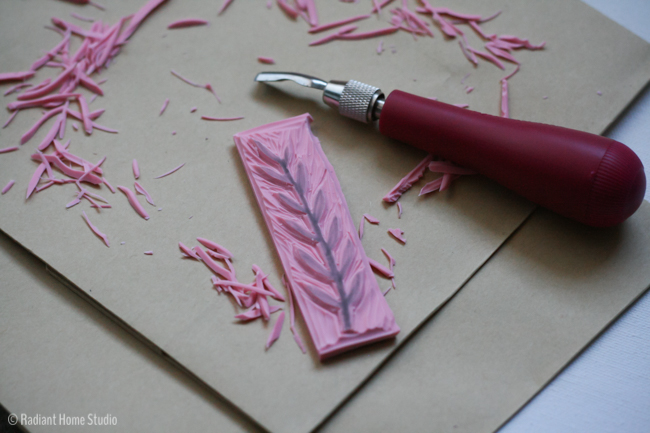
First, you’ll need to carve out pine branch from a soft block of rubber. (This is a Speedball Speedy Carve block – available at most craft stores. You can also use a soft eraser.) I won’t go into tons of detail about how to carve stamps. Basically, you use the smallest carving tool to outline your design and then go back with the larger ones to carve out the bigger spaces. If you don’t want to carve your own stamp, pre-made rubber stamps with holiday designs will work well too.

Printed & Stitched Handmade Gift Bag | Radiant Home Studio

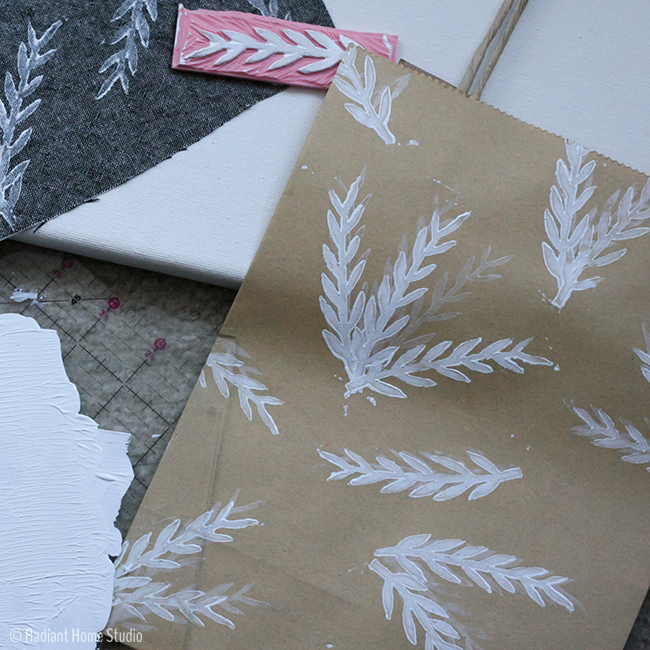
I used the screen printing ink that I already had, but simple acrylic craft paint or a stamp pad will work as well.

Printed & Stitched Handmade Gift Bag | Radiant Home Studio

To stitch on the bag, you’ll need your free motion quilting foot. Lower your feed dogs so you can move your paper around freely, and lower your presser foot to the quilting setting. (On my machine the lever goes down and toward the back.)

Place your bag under the needle and move it around in a circular motion until you have a nice spot of color. You may want to practice on a paper scrap before you try it on the bag. The great thing about this kind of stitching is that there really aren’t any rules. It’s like scribbling with the needle, which is a lot of fun.

Printed & Stitched Handmade Gift Bag | Radiant Home Studio

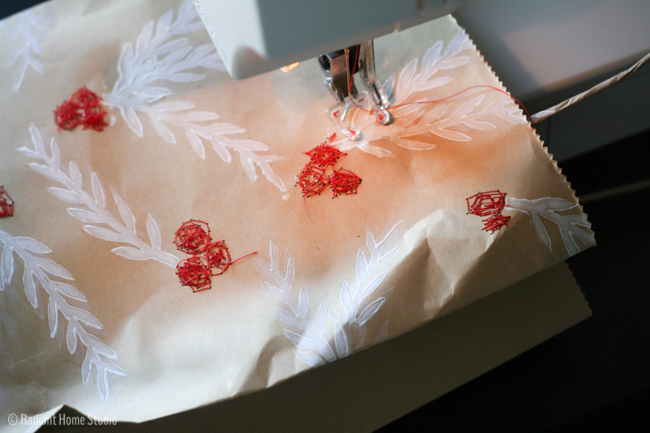
I had a hard time stitching near the bottom of the bag without wrinkling it, so I carefully opened up the bottom of the bag and glued it back together when I was done.

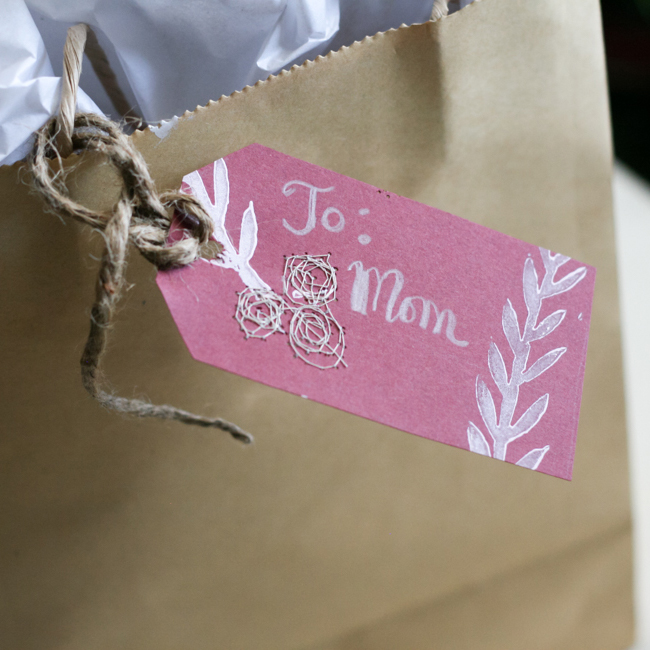
And then I used my practice paper to make pretty gift tags.

Printed & Stitched Handmade Gift Bag | Radiant Home Studio

This is a really fun open-ended project. I hope this inspires you to experiment with stamping and stitching on paper to make unique wrapping paper, cards, gift tags, or bags to make unique items for your friends and family!

Previous Post: « Learn How to Add Magnetic Snaps to Bags
Next Post: Hand Printed Christmas Ornament »

Reader Interactions

Comments

  1. Donna says

    December 15, 2014 at 1:48 pm

    Lovely gift bags. I have made more of my own gift bags this year as well.

    • Sara Curtis says

      December 15, 2014 at 1:53 pm

      Thank you Donna!

  2. Vicky Myers says

    December 16, 2014 at 4:40 pm

    Beautiful bags, so simple and effective:)

Primary Sidebar

Hello

Welcome! I’m Sara. I share modern home & accessory sewing patterns, and I create surface designs for licensing. I hope you are encouraged to see beauty in small things and are inspired to try new creative projects!

Shop Sewing Patterns


icon icon

icon icon

Newsletter

Sign up to get access to free sewing patterns & resource library!

Find My Work at:


© Copyright Notice

All images and text copyright ©2013-2020 Radiant Home Studio, unless otherwise noted. Please be kind enough to link back to my site and contact me if you would like to use my images.

Disclosure

I am a participant in the Amazon Services LLC Associates Program, an affiliate advertising program designed to provide a means for me to earn fees by linking to Amazon.com and affiliated sites.

Footer

Sign up to get access to free sewing patterns & resource library!

Favorite Adobe Illustrator tool? I love recoloring Favorite Adobe Illustrator tool? I love recoloring patterns. I probably spend way too much time with the recolor tool and not enough time making new patterns. 🤷🏻‍♀️

Last day to join the Immersion Course! If you have ever dreamed of making beautiful designs, Bonnie can teach you how to get what’s in your head into the computer and then how to make money from licensing your designs to companies for use on products. 

As a member of Bonnie’s support team, I’ll be there to make sure you don’t feel lost. There’s room for you...as Bonnie often reminds us!

#surfacepatterndesign #surfacepatterndesigner #surfacepatterncommunity #printandpattern #radianthomestudiopatterns #floralpattern #alltheflowers #artlicensing #flowersfordays #mutedflorals
Look what just came in the mail! Notebooks! This w Look what just came in the mail! Notebooks! This was a test batch to check quality and I’m thoroughly impressed.

I’ll be listing extra in the shop soon, but first dibs go to anyone that signs up for the Immersion Course using my link. I’ll be sending a small gift package and scheduling a course success/ coaching call with you!

Just a reminder that the last day to enroll in Immersion is tomorrow! If you are like me and overthink things until the last day, you are not alone. 

I know it’s a huge decision. I have an Immersion stories highlight if you want to know more or go to my profile to find a link to the info page. Message me all your questions! 

#immersioncourse #immersioncourse2021 #designernotebooks #learntodesign #learnillustrator #surfacepatterndesigner
Just got an order of stickers in! I’m debating a Just got an order of stickers in! I’m debating about putting them in the shop as a separate product or adding them to orders. I think I need a few more to make a pretty coordinating set! 🌹

Reminder: there’s still a couple more days to enroll in the Surface Pattern Design Immersion Course or the free mini-course from Bonnie! Links in my profile...as always. Keep messaging with questions! ☺️
It’s been a minute since I showed my face here! It’s been a minute since I showed my face here! ☺️

I wanted to get a little personal today. If you’re here for sewing & crafty stuff...stay tuned. I’m not abandoning you. 🙂 If you saw my stories last week, you may have learned that I’m deep in design mode for a few weeks, working with @bonniechristine on the Surface Pattern Design Immersion Course.

When I discovered Spoonflower (about 8 years ago!) and realized I could create my own fabric, I had this far off “maybe someday” dream to create a collection of designs for a fabric company.

I spent many years learning bits and pieces of design and business skills. But a couple of years ago I got more serious about making my dream a reality. 

Last year, I made an investment in myself and I joined the Immersion Course with Bonnie Christine. It was truly the community support and confidence that I gained that propelled me forward this year. Just a few weeks after Immersion ended I signed a licensing deal for children’s wall art with Oopsy Daisy and a few months after that...I signed a contract with a fabric company!

You guys...Bonnie is SO genuine and generous in everything she does. ❤️ It spills over into this beautiful and inspiring community that cheers each other on every step of the way. 

This year, Bonnie invited me to join her support team to help encourage new students through the course and provide technical support for all those tricky Illustrator issues. 🙌🏻

This course is for anyone that wants to invest in their creative career. My “wildest dream” came true this year. I’m actually feeling a bit lost right now because I need a bigger dream!

Whether you have a few years of experience like I did when I joined or you have never used design software...Bonnie will walk you through the ENTIRE process. This is like a college-level course on design and creative business. We have many older students starting a second career, people that just graduated design school but don’t know how to practically start an art-based business, and people from dozens of countries around the world. It’s a beautiful, diverse community filled with people taking steps toward their creative business goals.

More below...
We had our first day of fake spring yesterday. It We had our first day of fake spring yesterday. It was warm for one day and it’s back to being cold. 🤷🏻‍♀️

I always draw flowers anyway. I’m hoping some of the local botanical gardens open back up this year. We have some really great inspiration nearby and flowers will start blooming soon!

It’s the little bits of beauty that inspire me the most. What are you looking forward to this Spring?
Just a reminder that I have this heart garland tut Just a reminder that I have this heart garland tutorial linked in my profile if you want to make some happy Valentine’s decor this week.

My girls are origami experts, so we worked together on these video tutorials last year. It’s a good family project for older kids! 💕

#heartcrafts #valentinesdecor #valentinecrafts #mycolorfulhome #cozymodernvibe #diyvalentinesdecor
This another favorite pattern of mine. As my style This another favorite pattern of mine. As my style has developed, I’ve embraced the imperfect lines and tend to work with graphic, but organic shapes. I like unexpected little pops of color or shapes that emerge from layering.

My iPad is at the fix-it shop, so of course, I’m feeling inspired today. ☺️ Maybe I should try some actual sketching and planning on paper with a pencil...😜

#radianthomestudiodesign #fabricdesign #surfacepatterndesign #surfacepatterncommunity #surfacepatternlife #licensingartist #artlicensing
Remember last year, the girls and I made this cute Remember last year, the girls and I made this cute origami heart garland tutorial? ❤️💙💛🧡

I don’t usually decorate with themed stuff, but these are fun to make and add some joyful, non-tacky hearts around the house for Valentine’s Day. 💕 I popped the link in my profile buttons. There are videos in the blog posts too. 

Also, I shared some personal stuff in my stories today!

#origamigarland #origamiproject #valentinesdecor #valentinesgarland #valentinescrafts #origamiheart #origamihearts #papercrafts #heartcraft #happyhearts #joyfulhome #mycolorfulhome
Follow on Instagram
  • Disclosures & Copyright
  • About
  • Contact me!
  • Digital Pattern FAQ’s

Copyright © 2021 · Sara Curtis // beloved theme