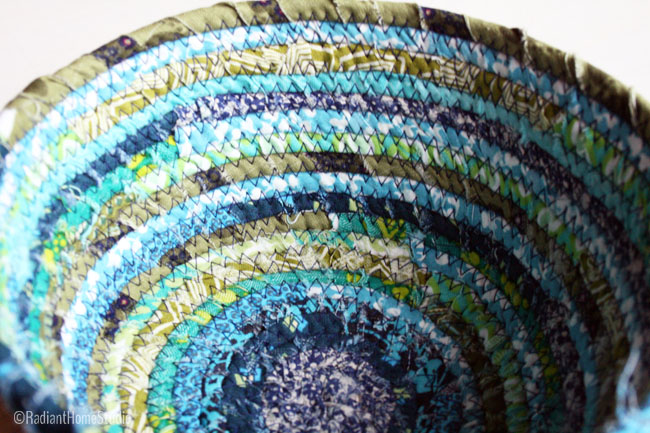
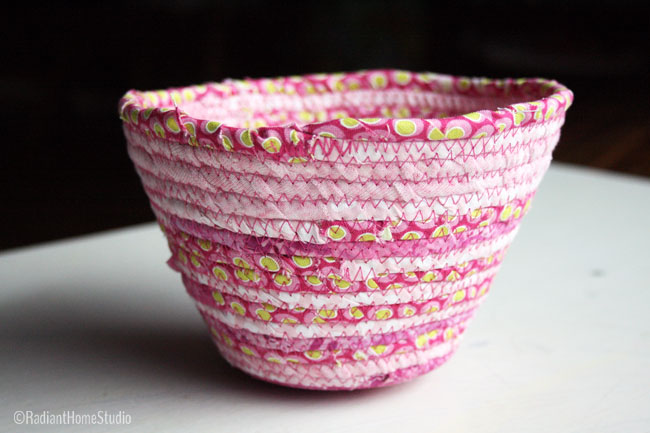
These fabric scrap bowls were a quick project I made to use up some of my fabric scraps and some cording rope I was given. I really enjoyed choosing the coordinating fabric strips, and I found the repetitive wrapping and sewing motion a relaxing afternoon project.

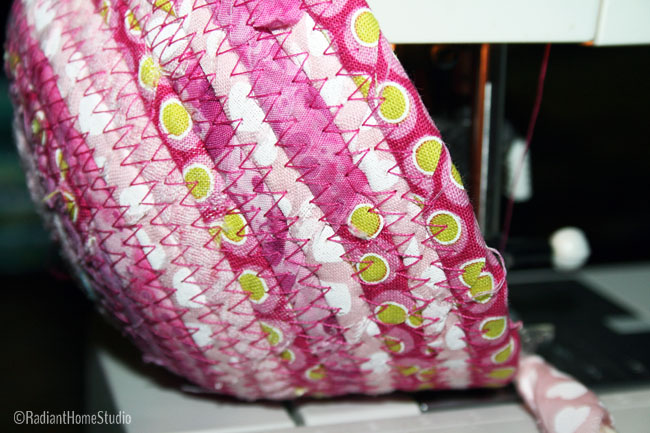
There are scrappy fabric bowl tutorials all over the internet, so I won’t go into great detail about how to make them. You can see from the photos in the process that the basic idea is to wrap fabric strips around a cord or clothesline and use a wide zigzag stitch to hold the rows together as you coil the rope around to form a bowl. The best way to learn is to experiment.
I have compiled a list of the most helpful and inspiring fabric bowl tutorials I have found while searching for tips and ideas.


A few of my favorite Fabric Scrap Bowl Tutorials:
- I’ve been seeing examples for years, but my most recent inspiration was a post by Cynthia Frenette (a fabric designer and artist) filled with beautiful baskets and a few helpful sewing tips. Cynthia’s finished basket pile motivated me to pull out my scraps and start cutting! (Update: It looks like Cynthia has updated her post! I also spotted some lovely baskets in her Instagram feed, and I discovered that #ropebasket brings up even more amazing inspiration!)
- I used the technique described at the Pretty Prudent blog at first, but I couldn’t keep the rows tight enough. They recommend wrapping fabric around two or three rows every few inches to hold the coils together (instead of sewing). For those that don’t sew, it might be a good option to try if you have more patience than me!
- For a step-by-step tutorial, CraftyStylish has a nice post that includes instructions for making handles on your fabric baskets.
- Donna, at This Year’s Dozen, suggests using binder clips to hold the coiled fabric in place around the rope, shares frugal alternatives to clothesline and ideas for hiding the rope end, and shows off a beautifully finished basket with wooden handles.
- Mister Domestic has a fun style and a video tutorial!
I just made a couple of small baskets, but it is quite addicting. I would love to try some bigger baskets with more natural colors when I can get some more rope!
Have you made any coiled rope baskets like these?


Wow… I haven’t seen as great idea as this for a ages! I must try this sometime.
Thank you! Can’t take credit for the idea, but have fun trying it out!
Really like this idea… I will have to give it a try!
Love to see it if you post it anywhere online!
Love these! BTW, are you snowed/iced in yet?
Thanks! Yes, we are stuck at home…but I have lots of sewing to do!
Wow! thank you so much! Actually, I was not aware these are all over the place but I certainly do appreciate you taking the time to put together this list of resources. Love how your bowls turned out.
Great! I was hoping that I wasn’t sharing something that everyone had already seen everywhere. I’d love to know if you make any!
I love it. I have just discovered my next project.
Thank you! Happy sewing 🙂
There’s a book called” it’s a wrap. “I found it at Johannes fabrics.I’ve made quite a few.they turned out great and real easy to do..
Thanks! It looks like there are 2 or 3 books using this technique. Great resources!
I have been wanting to make these fabric bowls for a long time. Not only do I have a boatload of fabric scraps but wanted to make these for gifts for my quilting gal pals. Thanks so much for this tutorial and connected sites.
You’re welcome! It is a really fun way to use up those scraps. I’d love to see what you end up making!
Thanks for pulling together the resource list….esp since my local quilt shop where friend works isn’t offering the bowls/baskets ‘for now’. Seems demands are elsewhere, fests happening, retreats, etc. With holidays coming, I see these as wonderful gifts.
No problem! Have fun sewing some!
I was at a quilt event last year and a quilter there was making fabric baskets. She wasn’t wrapping her clothesline, I thought she was sewing it first? She was only there that one night and I didn’t get the information on how to get the pattern. I thought she sewed the clothesline and fabric in sort of a tube, then she starting doing the coil. It is hard to explain. It was like she wrapped the fabric strip and stitched it in a huge long strip. Not wrapped around and around but more like a long casing. Does this make any sense at all? Love your baskets and bowls. They are so beautiful.
Interesting! I can’t quite visualize it, but I know there are other methods for similar bowls. I’ve seen some recently with just the clothesline and no fabric. They look nice if you like natural and minimal.
It sounds like she was making covered cording then making the basket with it.
Hello,
I was wondering if they can be washed in the washer. I’ve had one for a long time and want to wash it since my neighbor decided it made a good dog bed for her dog.
Thank you!
Hi Terry, I think washing them by machine might be too harsh. If it is made with cotton rope, there may be some shrinkage. In addition, the bowl will probably be misshapen during the spin cycle. I’d recommend hand washing and line drying something like this.
Thank you, Sara!
Your second bulleted item makes no sense whatsoever. It would be helpful for you to re-word this. I want to make an Easter basket for my granddaughter, but am finding mostly people who have found something they can make, but cannot teach. I fear my idea of an East basket for this year is going down the drain.
Hi Rebecca. Thanks for your feedback. This post is just a round-up of ideas and not meant to be a tutorial. It has been popular though, so I have considered writing a post teaching people how to do it. But I really think the best way to learn is to experiment! There are several “right” ways to make it work, and the materials are inexpensive. I recommend trying it and working out the details as you go. Regarding the second bullet point…it probably makes more sense if you go to the link and look through the technique they use before reading my comments. I added “(instead of sewing)” to help clarify.
A couple of weeks ago I saw a tutorial for what I believe was called “Comptom bowls”. They were stacking bowls. Now I can’t find it again. Anyone ever heard of these?
Hi Jan, it’s just me here reading the comments, so I don’t expect anyone else will jump in. I haven’t heard of the bowls you are looking for. I did a couple of google searches to see if anything like that came up, but I don’t see what you are looking for. If you try “make stacking bowls” and scroll through the image search results, maybe you can find what you are looking for. Thanks!
Sara
Almost finished my second bowl and just love making them. The first one I did simply by cutting trips of material, winding it round the cord and machine it stitching it. all into a bowl. Although I loved the idea I didn’t like the raggy look with threads all over it. The second one which I am now working on, I cut the strips of material and quickly pressed one side so that it has a smooth finished edge. I was winding it while at the machine and building the bowl as I went along. I decided tonight to wind all the finished edge round the cord as I sat in front of the TV.so I now have yards of tightly wound material all ready for me to wizz it into a bowl tomorrow. Thank you again for this tutorial.
Great idea! I’m sure there are some other people that will prefer a more tidy look and appreciate your helpful comment. It’s been a while since I made one of these and I’ve been hoping to make some more big ones soon!
How do you make sides go straight up like letter U rather than a tea cup ?
Hi Ann,
The best way to make the shapes is to experiment. To get a steeper side, you need to move the rope to a different angle than you would for the gentle slope. It’s difficult to explain in words, but if you make a couple, you’ll get the idea pretty quickly. Thanks for asking!
Sara
If you buy the book “It’s a Wrap” it will show you how to gradually lift the wrapped bowl to make the sides go up instead of lying flat…I have the book and made a few of these bowls…the book has many different ideas and is worth buying….You wont be disappointed! Good luck!
Thank you for the recommendation!
I have been making the bowls for quite a while, one thing I do that helps me, when you get to the end of a strip I use fabric glue to hold the end in place, when I start another strip I put fabric glue on the end and overlap the end of the previous one and hold it in place with a clothes pin, I keep winding the cord this way until I have enough for a bowl then go back and remove the clothes pins.
Good tip! Thank you!
I love making these bowls as gifts.
The link to the Cynthia Frenette post doesn’t work. What did she say?
Thank you! I’ll check on it. This post is over a year old, so I haven’t checked the link recently.
It looks like she has moved her site and decided to focus more on her design work. I updated that bullet point with some new links though, and I’m hoping Cynthia still has the original post somewhere so I can link to it later. Thanks for letting me know!
What a fun idea! I had seen tutorials to make fabric scrap rugs but never baskets before. I love to find functional uses for all the scraps I generate.
Would you find sharing what thickness of cording you used? Thank you!
Thank you! I used standard clothesline. I believe it’s around 1/4″ thick. That makes it thick enough to have some structure and small enough to fit under the presser foot!
would parachute cord work instead of clothesline?
I’m not sure what parachute cord is. You’ll want to use something that is about 1/4″ thick and mostly cotton. Anything that is stiff could be rough on your machine.
I’m just now starting to make these baskets and they are really fun. It’s a bit like magic when the sides start defining the bowl don’t you think? I enjoyed reading your tutorial and found it helpful. Thanks for sharing your photos.
Yes! Lots of fun!
Hi Sara
I had to look twice at your main picture. I made a bowl ages ago and i cant believe how similar it looks.
I’d send you a picture but I’m not sure how to attach it. I really thought it was mine!
Great tutorial by the way !
Helen
How funny! I’d love to see it. You can’t attach a picture in the comments, but you can e-mail it to sara @ radianthomestudio .com if you’d like 🙂
Hi, Sara. I am attempting to make a basket for a baby shower gift which will be filled with a baby quilt and crocheted afghan I did in a chevron pattern in grays, aquas and white. I usually give a gift like this in a medium size laundry basket but the one I purchased is natural color, not white, and is not very well-made. Also, no time to spray paint it white in the next 2 weeks! My question is: how large of a basket have you made or could you make? I’m hoping for an oval laundry basket shaped and sized basket, maybe 24″ long and 15″ wide on top, 12-15″tall on the sides. Is this too large to handle, and will it hold its shape or be too floppy?
Please advise asap.
Rosemary
Hi Rosemary,
I’ve certainly seen rope baskets that wide. I’m not sure about the height without some support, but you can definitely make something that works to hold a baby gift. What about something like this? https://www.etsy.com/listing/479764760/rope-display-bowl-18-long-by-12-wide-by?ga_order=most_relevant&ga_search_type=all&ga_view_type=gallery&ga_search_query=large%20rope%20bowl&ref=sr_gallery_14
Sara