• SHOP
  • About
    • About Sara
    • Contact me!
    • Design Collaborations
    • Sewing Collaborations
  • Sewing
    • Sewing Tutorials
    • Things I Made
  • Design Portfolio
  • Blog
  • Nav Social Menu

    • Facebook
    • Instagram
    • Pinterest
Radiant Home Studio

Radiant Home Studio

August 22, 2016 ·

Mom’s Minivan Organizer Sew-along #3

Sew-along

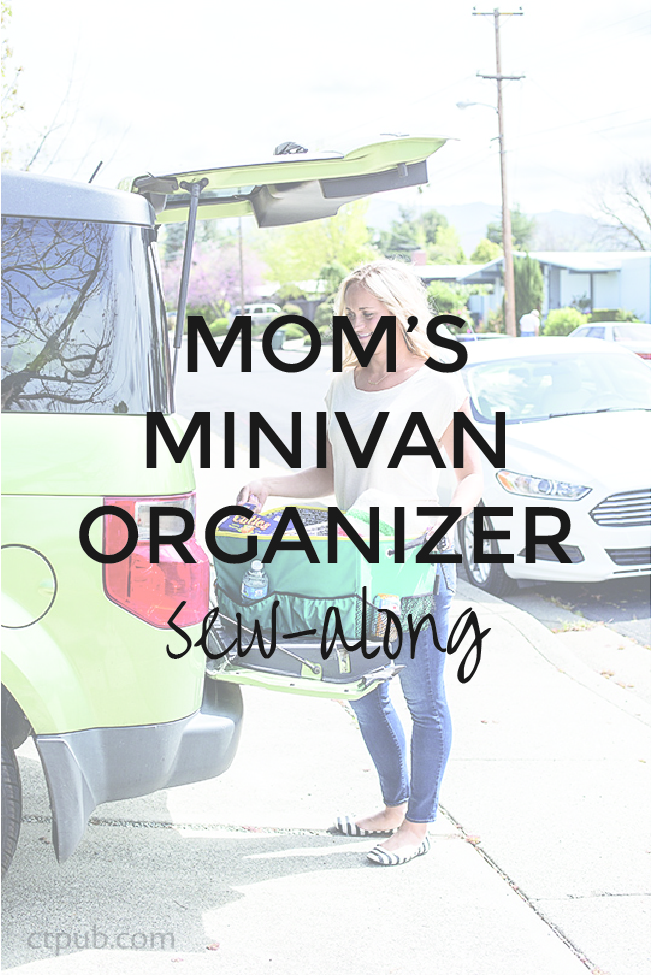
This is the third post for the Mom’s Minivan Organizer from On the Go Bags. If you are just joining, check out the intro post, and the first and second sew-along posts.

In this post, we’ll be assembling the lining and the removable divider!

You can find the instructions on page 107-108 of the book.

Mom's MInivan Organizer Sew-along | On the Go Bags | Radiant Home Studio

(This post contains affiliate links. Thanks for helping to support my business!)

If you haven’t already, please join the On the Go Bags Facebook group to share your progress and keep up with the details of the sew-along. We would love to see what you are making!

Make the lining:

The first step is to add the loop side of the hook-and-loop tape to the lining side panels. You can find the measurements on page 107 of the book. Make sure you follow the diagrams so that the spacing is correct for the hook-and-loop tape.

You can attach the hook-and-loop tape as described, or substitute snaps. I tried to use 3 plastic snaps on each side, but it ended up causing problems. Though the snaps went through the layers of interfacing, I could tell they weren’t going to be strong enough when a couple popped off. I removed them (not an easy process…) and added the hook-and-loop tape. I still think snaps would be great, but I would recommend using them only if you have access to an industrial snap press and longer than average snap studs. If you choose to use snaps, place the female sides of the snaps on the lining sides.

Mom's MInivan Organizer Sew-along | Pockets & Elastic | On the Go Bags | Radiant Home Studio

After you finish the hook-and-loop tape, you’ll stitch the 4 sides of the lining together and then attach the bottom as you did for the exterior. This should all be pretty straightforward, though the lining does start to get bulky by the time you get to the bottom. Just work slowly and try to wrestle the interfacing out of the way. You can always press it again to smooth it out when you’re done.

Make the divider:

You should have fused the stabilizer and interfacing to one of the divider pieces in the beginning. If you missed that part, go ahead and do it now. You’ll have to wrestle the interfacing a little bit to turn it right side out, but as I said above…just press it when you finish.

Use the measurements given in the book to create the flaps for the hook-and-loop tape. Apply the loop side (that’s the rough side) to the divider flaps. The flaps will fold opposite directions, forming a “z” shape. It helps to steam the creases. The loop tape goes on top and bottom of the “z”, facing the organizer lining. If you choose to use snaps, place the male sides of the snaps facing toward opposite sides.

Mom's MInivan Organizer Sew-along | Pockets & Elastic | On the Go Bags | Radiant Home Studio

Mom's MInivan Organizer Sew-along | Pockets & Elastic | On the Go Bags | Radiant Home Studio

Mom's MInivan Organizer Sew-along | Pockets & Elastic | On the Go Bags | Radiant Home Studio

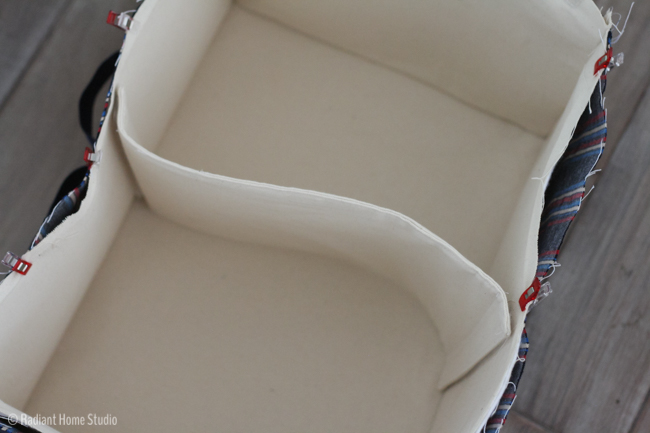
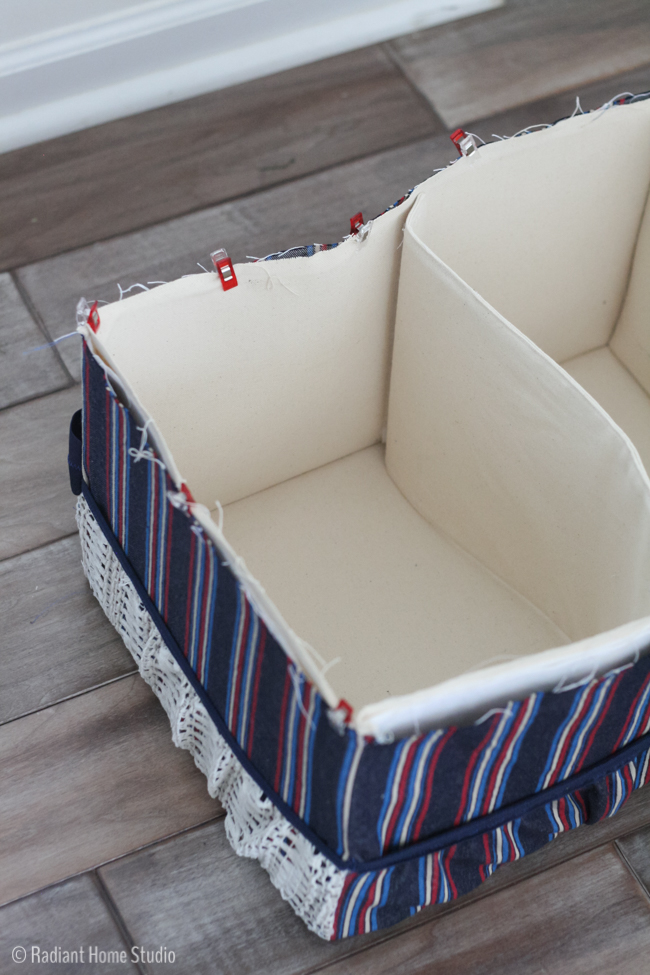
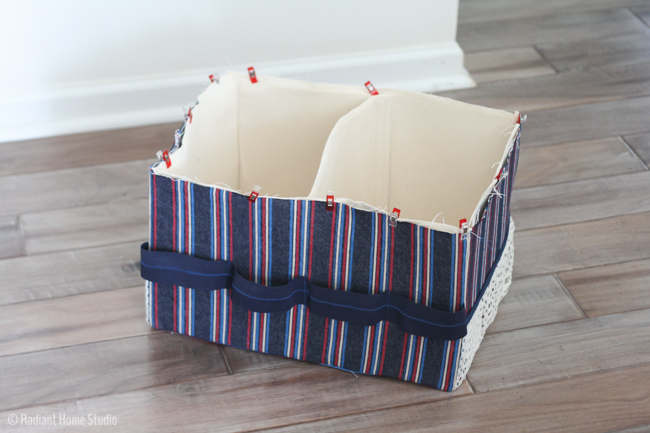
Now that you have the lining finished, you can slide the lining into the exterior! I placed Wonder clips (which are so much easier for binding than pins!) around the top edge to prep mine for binding.

We’ll finish the binding on Thursday and I’ll post a link-up that will be open until the end of September…

P.S. If you still need a book, you can get one from Amazon or through C&T!

Previous Post: « Mom’s Minivan Organizer Sew-along #2
Next Post: Mom’s Minivan Organizer Sew-along #4 & Link-up »

Primary Sidebar

Hello

Welcome! I’m Sara. I share modern home & accessory sewing patterns, and I create surface designs for licensing. I hope you are encouraged to see beauty in small things and are inspired to try new creative projects!

Shop Sewing Patterns


icon icon

icon icon

Newsletter

Sign up to get access to free sewing patterns & resource library!

Find My Work at:


© Copyright Notice

All images and text copyright ©2013-2020 Radiant Home Studio, unless otherwise noted. Please be kind enough to link back to my site and contact me if you would like to use my images.

Disclosure

I am a participant in the Amazon Services LLC Associates Program, an affiliate advertising program designed to provide a means for me to earn fees by linking to Amazon.com and affiliated sites.

Footer

Sign up to get access to free sewing patterns & resource library!

Favorite Adobe Illustrator tool? I love recoloring Favorite Adobe Illustrator tool? I love recoloring patterns. I probably spend way too much time with the recolor tool and not enough time making new patterns. 🤷🏻‍♀️

Last day to join the Immersion Course! If you have ever dreamed of making beautiful designs, Bonnie can teach you how to get what’s in your head into the computer and then how to make money from licensing your designs to companies for use on products. 

As a member of Bonnie’s support team, I’ll be there to make sure you don’t feel lost. There’s room for you...as Bonnie often reminds us!

#surfacepatterndesign #surfacepatterndesigner #surfacepatterncommunity #printandpattern #radianthomestudiopatterns #floralpattern #alltheflowers #artlicensing #flowersfordays #mutedflorals
Look what just came in the mail! Notebooks! This w Look what just came in the mail! Notebooks! This was a test batch to check quality and I’m thoroughly impressed.

I’ll be listing extra in the shop soon, but first dibs go to anyone that signs up for the Immersion Course using my link. I’ll be sending a small gift package and scheduling a course success/ coaching call with you!

Just a reminder that the last day to enroll in Immersion is tomorrow! If you are like me and overthink things until the last day, you are not alone. 

I know it’s a huge decision. I have an Immersion stories highlight if you want to know more or go to my profile to find a link to the info page. Message me all your questions! 

#immersioncourse #immersioncourse2021 #designernotebooks #learntodesign #learnillustrator #surfacepatterndesigner
Just got an order of stickers in! I’m debating a Just got an order of stickers in! I’m debating about putting them in the shop as a separate product or adding them to orders. I think I need a few more to make a pretty coordinating set! 🌹

Reminder: there’s still a couple more days to enroll in the Surface Pattern Design Immersion Course or the free mini-course from Bonnie! Links in my profile...as always. Keep messaging with questions! ☺️
It’s been a minute since I showed my face here! It’s been a minute since I showed my face here! ☺️

I wanted to get a little personal today. If you’re here for sewing & crafty stuff...stay tuned. I’m not abandoning you. 🙂 If you saw my stories last week, you may have learned that I’m deep in design mode for a few weeks, working with @bonniechristine on the Surface Pattern Design Immersion Course.

When I discovered Spoonflower (about 8 years ago!) and realized I could create my own fabric, I had this far off “maybe someday” dream to create a collection of designs for a fabric company.

I spent many years learning bits and pieces of design and business skills. But a couple of years ago I got more serious about making my dream a reality. 

Last year, I made an investment in myself and I joined the Immersion Course with Bonnie Christine. It was truly the community support and confidence that I gained that propelled me forward this year. Just a few weeks after Immersion ended I signed a licensing deal for children’s wall art with Oopsy Daisy and a few months after that...I signed a contract with a fabric company!

You guys...Bonnie is SO genuine and generous in everything she does. ❤️ It spills over into this beautiful and inspiring community that cheers each other on every step of the way. 

This year, Bonnie invited me to join her support team to help encourage new students through the course and provide technical support for all those tricky Illustrator issues. 🙌🏻

This course is for anyone that wants to invest in their creative career. My “wildest dream” came true this year. I’m actually feeling a bit lost right now because I need a bigger dream!

Whether you have a few years of experience like I did when I joined or you have never used design software...Bonnie will walk you through the ENTIRE process. This is like a college-level course on design and creative business. We have many older students starting a second career, people that just graduated design school but don’t know how to practically start an art-based business, and people from dozens of countries around the world. It’s a beautiful, diverse community filled with people taking steps toward their creative business goals.

More below...
We had our first day of fake spring yesterday. It We had our first day of fake spring yesterday. It was warm for one day and it’s back to being cold. 🤷🏻‍♀️

I always draw flowers anyway. I’m hoping some of the local botanical gardens open back up this year. We have some really great inspiration nearby and flowers will start blooming soon!

It’s the little bits of beauty that inspire me the most. What are you looking forward to this Spring?
Just a reminder that I have this heart garland tut Just a reminder that I have this heart garland tutorial linked in my profile if you want to make some happy Valentine’s decor this week.

My girls are origami experts, so we worked together on these video tutorials last year. It’s a good family project for older kids! 💕

#heartcrafts #valentinesdecor #valentinecrafts #mycolorfulhome #cozymodernvibe #diyvalentinesdecor
This another favorite pattern of mine. As my style This another favorite pattern of mine. As my style has developed, I’ve embraced the imperfect lines and tend to work with graphic, but organic shapes. I like unexpected little pops of color or shapes that emerge from layering.

My iPad is at the fix-it shop, so of course, I’m feeling inspired today. ☺️ Maybe I should try some actual sketching and planning on paper with a pencil...😜

#radianthomestudiodesign #fabricdesign #surfacepatterndesign #surfacepatterncommunity #surfacepatternlife #licensingartist #artlicensing
Remember last year, the girls and I made this cute Remember last year, the girls and I made this cute origami heart garland tutorial? ❤️💙💛🧡

I don’t usually decorate with themed stuff, but these are fun to make and add some joyful, non-tacky hearts around the house for Valentine’s Day. 💕 I popped the link in my profile buttons. There are videos in the blog posts too. 

Also, I shared some personal stuff in my stories today!

#origamigarland #origamiproject #valentinesdecor #valentinesgarland #valentinescrafts #origamiheart #origamihearts #papercrafts #heartcraft #happyhearts #joyfulhome #mycolorfulhome
Follow on Instagram
  • Disclosures & Copyright
  • About
  • Contact me!
  • Digital Pattern FAQ’s

Copyright © 2021 · Sara Curtis // beloved theme