• About
    • About Sara
    • Contact me!
  • Shop
    • All Sewing Patterns
    • All Printables
    • Cart
    • Checkout
    • My Account
    • Help with Digital Patterns
  • Sewing
    • Sewing Tutorials
    • Things I Made
  • Design Portfolio
  • Collaborations
    • Design Collaborations
    • Sewing Collaborations
  • Nav Social Menu

    • Facebook
    • Instagram
    • Pinterest
Radiant Home Studio

Radiant Home Studio

February 17, 2015 ·

Reversible Tote Bag with Strong Straps {Tote Bag Upgrade}

Sewing· Tutorials

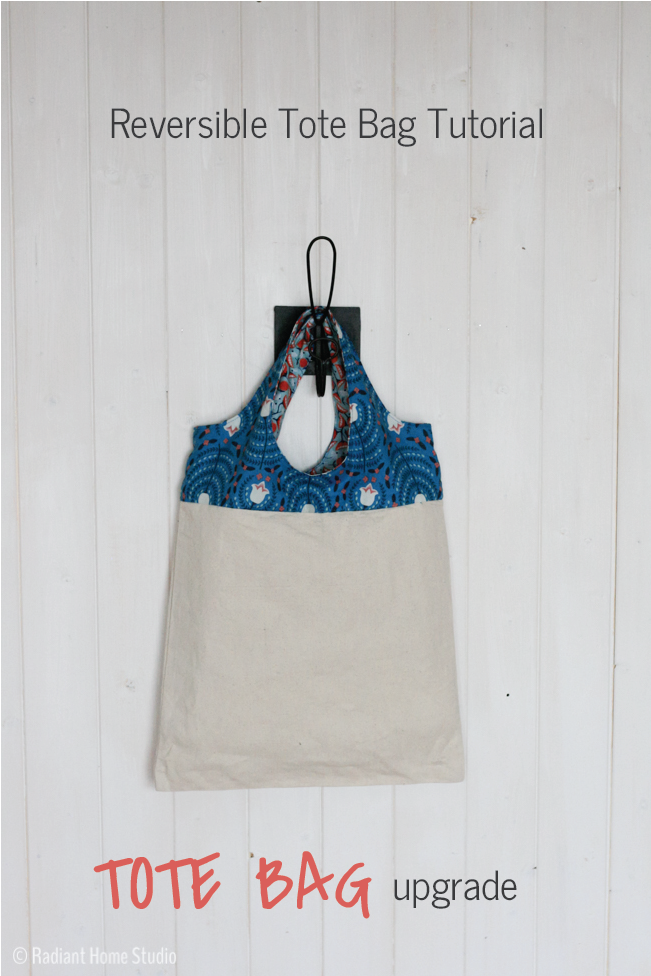
Let’s do something about those plain tote bag straps! I really love my handmade grocery sacks, with the strong and wide straps. We take them to the library and fill them with books, pack them full of extra clothes for outings, and take them to the grocery store to fill with food. I leave some hanging by the door at all times for that last minute kid stuff that we decide to bring with us.

Sew a Reversible Tote Bag with Strong Straps | Radiant Home Studio

I’ll show you how to make pretty, reversible tote bag with strong straps. Not only are the handles sturdier, they also provide an opportunity to add some color and pattern. You can use matching fabric for a streamlined, two-tone bag or mix some coordinating prints to match your style. Just like the other tote bag upgrades, this update doesn’t require a lot of fabric. You can use up what you have, or grab a couple of fat quarters at the fabric shop.

Sew a Reversible Tote Bag with Strong Straps | Radiant Home Studio

Materials:

• 1 canvas tote bag
• 1/2 yd. or 2 fat quarters of quilting cotton
• 1/2 yd. mid-weight interfacing (I recommend Pellon 931.)
• 1/2 yd. lining fabric (optional)
• matching thread
• tote bag handles template download (or draft your own pattern – instructions below…)

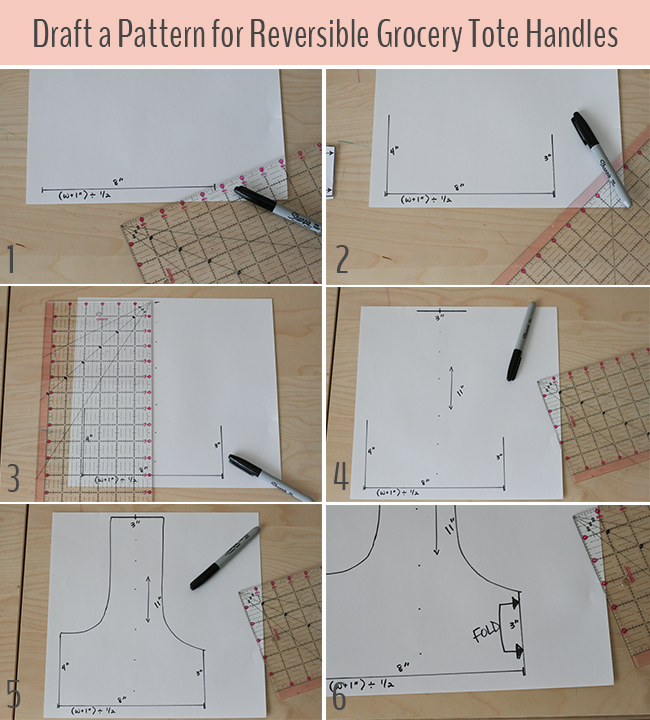
I drafted the template for a 15″ tote bag, but if your bag is larger or smaller you can lengthen or shorten the curves on my template or draw your own.

To make your own pattern, measure the width of your tote bag and add 1″ for seam allowance. 1. Draw a horizontal line that is 1/2 of the width+seam allowance. That is the base line. 2. Draw a 4″ vertical line on the left and a 3″ vertical line on the right side of the baseline. 3. Measure 11″ above the center of the baseline and make a mark. 4. Draw a 3″ horizontal line centered across that mark. 5. Draw curves to connect the lines. The curves do not need to be exactly the same as mine. Use french curves or a large bowl to get a smooth curve. 6. Mark the fold.

Sew a Reversible Tote Bag with Strong Straps | Radiant Home Studio

Reversible Tote Bag with Grocery Handles:

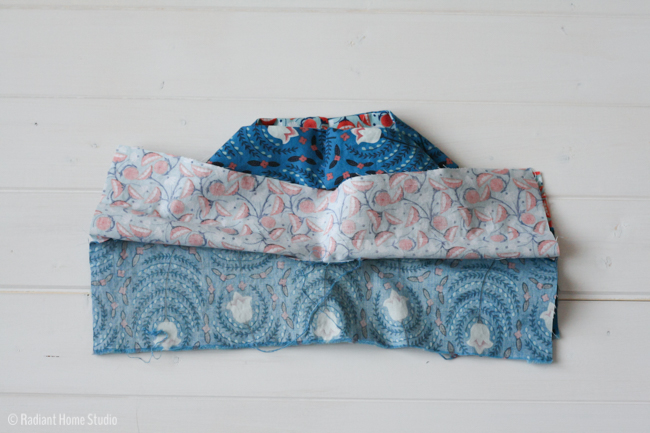
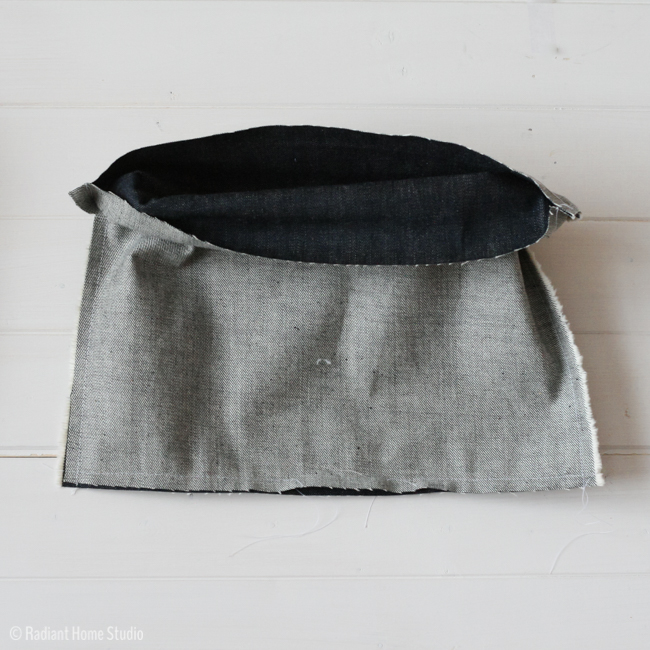
1. Cut out 2 exterior and 2 lining pieces from the template. Apply interfacing to the exterior for stronger straps. Place one exterior and one lining piece right sides together and stitch along the curved sections with 1/4″ seam allowance. Clip the seam allowance along the curve. Repeat for the other exterior and lining pieces. Turn the pieces right side out and press.

Sew a Reversible Tote Bag with Strong Straps | Radiant Home Studio

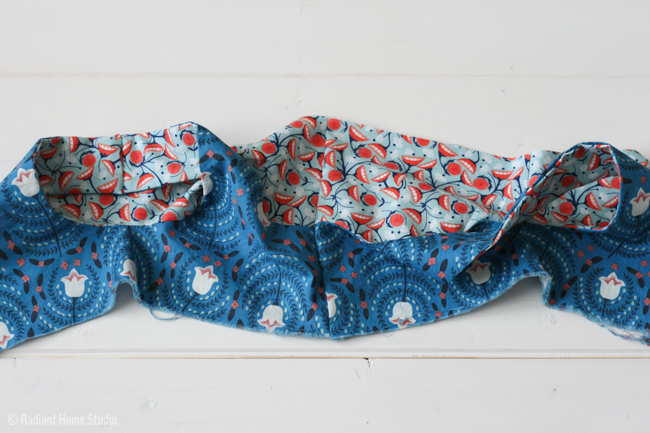
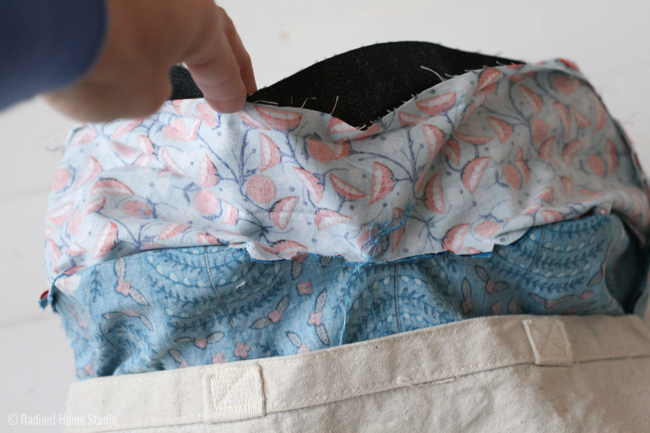
2. Turn one side of the handle inside out again. Insert the right side out handle into the inside out handle, being careful not to twist the fabric. I photographed this in several steps to help clarify the process.

Sew a Reversible Tote Bag with Strong Straps | Radiant Home Studio Sew a Reversible Tote Bag with Strong Straps | Radiant Home Studio Sew a Reversible Tote Bag with Strong Straps | Radiant Home Studio

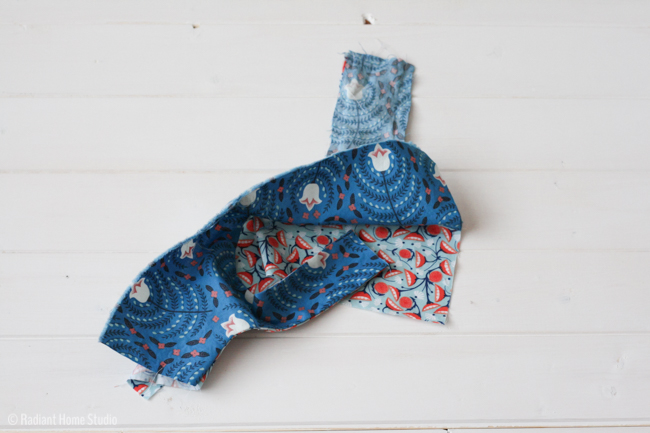
3. Stitch along the top of the handles with a 1/4″ seam allowance. Pull the handle inside handle to turn the piece right side out. Repeat steps 3-4 for the other side.

Sew a Reversible Tote Bag with Strong Straps | Radiant Home Studio

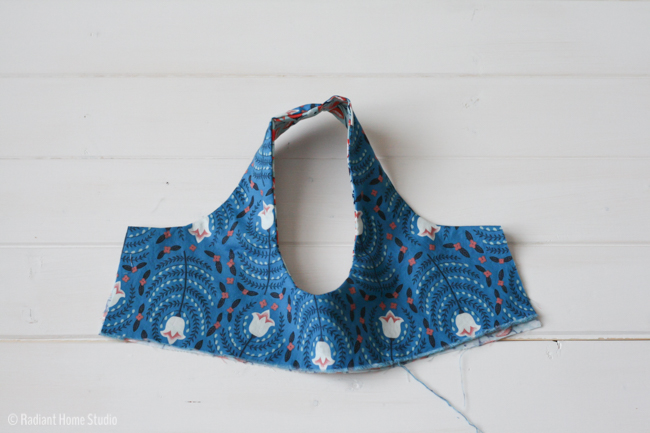
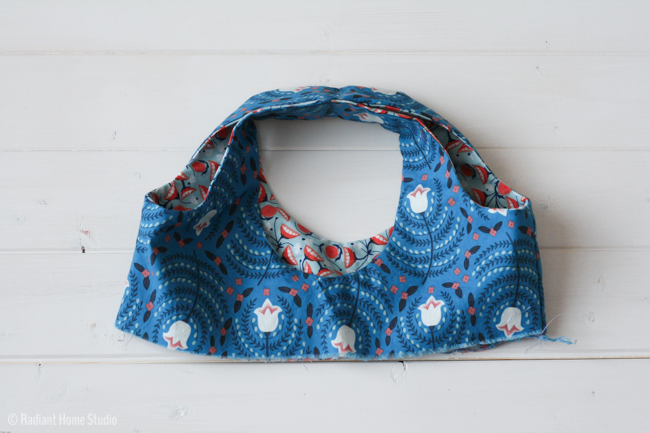
4. Place one strap piece right side up and open out the lining from underneath.

Sew a Reversible Tote Bag with Strong Straps | Radiant Home Studio

Place the other strap piece on top of the first with the right sides together and the lining opened up. Align the side edges or both the lining and exterior, matching the seams.

Sew a Reversible Tote Bag with Strong Straps | Radiant Home Studio

The finished seam should look like this.

Sew a Reversible Tote Bag with Strong Straps | Radiant Home Studio

Sew both sides, so that you have a complete circle. Topstitch around all of the curved edges.

Sew a Reversible Tote Bag with Strong Straps | Radiant Home Studio

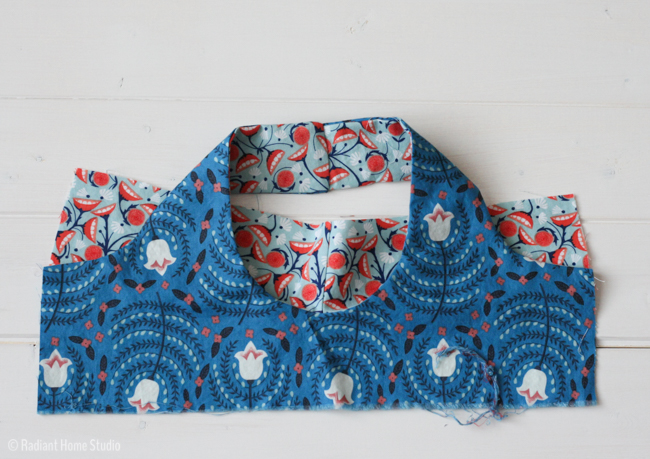
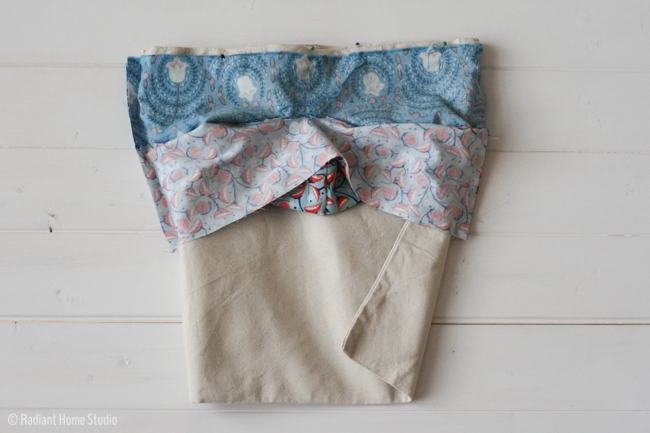
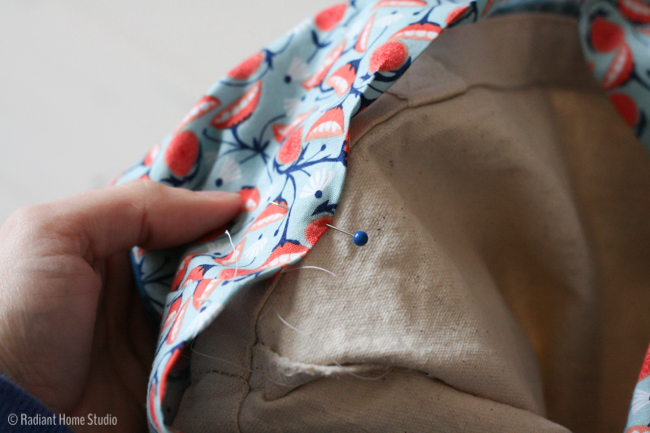
5. Cut the straps off your tote bag. Match the lower edge of the exterior strap piece to the right side of the tote bag. You will be sewing below the hemmed edge of the bag (usually about 1″ below the top edge), so align the straps about 1/2″ below the top edge of the tote bag. Stitch on the inside of the tote bag, just next to the folded edge of the pre-made hem. Open and press.

Sew a Reversible Tote Bag with Strong Straps | Radiant Home Studio

6. To make the lining, measure the width of the bag and the height from the bottom of the bag to the strap fabric. Add 1″ to each dimension and cut 2 rectangles. Sew along 3 of the sides with a 1/2″ seam allowance, leaving a 3-4″ opening in the bottom. Turn it right side out.

Sew a Reversible Tote Bag with Strong Straps | Radiant Home Studio

7. Turn the tote bag inside out. Match the lower edge of the strap lining to the open side of the lining. Stitch with a 1/2″ seam allowance. Turn the bag right side out through the opening in the lining. Hand stitch the lining closed using a ladder stitch.

Sew a Reversible Tote Bag with Strong Straps | Radiant Home Studio

Another finishing option: If you don’t care that the bag is reversible, skip steps 6 & 7. Press the lower edge of the strap lining under 1/2″. Align the edge about 1/8″ below the fold of the tote bag hem. Topstitch in place.
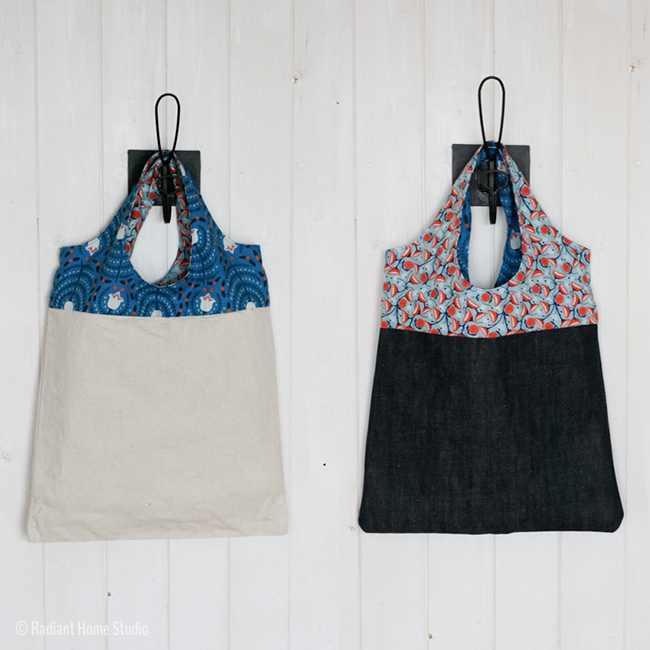
Sew a Reversible Tote Bag with Strong Straps | Radiant Home Studio

And that’s it!

Sew a Reversible Tote Bag with Strong Straps | Radiant Home Studio

Sew a Reversible Tote Bag with Strong Straps |Bag Sewing Tutorial | Radiant Home Studio

If you missed the previous Tote Bag Upgrades, check out these posts:

• Two Ways to Line a Tote Bag
• Add a Cargo Pocket to a Tote Bag

Previous Post: « Patchwork Heart Zipper Pouch Tutorial
Next Post: Embroidered Fabric Envelopes »

Reader Interactions

Comments

  1. Krista says

    February 17, 2015 at 1:23 pm

    This is such a great series, Sara! I look forward to what you will be doing each time. I can envision this as a great class because each element can build on another for a custom look!

    I’m curious to know–do you have a suggestion (or caution) for how small a bag size to use? Hobby Lobby has some 5″ x 6″ mini canvas totes which would be cute with some upgrading. Adding a lining would probably work, but maybe not an exterior pocket? I thought maybe you would know! 🙂

    Krista

    • Sara Curtis says

      February 17, 2015 at 1:45 pm

      Thank you! I think little tote bags would be a cute idea, especially for little girls. You’ll just have to do a bit of measuring to get the sizes of the lining right. I’m not sure the cargo pocket would work at the size I made mine, but you could definitely do a patch pocket. I think the tricky part with small bags is getting in under the presser foot. If you have trouble, you can always cut the side seams open and sew them back when you are finished.

Primary Sidebar

Hello

Welcome! I’m Sara. I share modern home & accessory sewing patterns, and I create surface designs for licensing. I hope you are encouraged to see beauty in small things and are inspired to try new creative projects!

Shop Sewing Patterns


icon icon

icon icon

Newsletter

Sign up to get access to free sewing patterns & resource library!

Find My Work at:


icon

icon


Resources I Love:


© Copyright Notice

All images and text copyright ©2013-2019 Radiant Home Studio, unless otherwise noted. Please be kind enough to link back to my site and contact me if you would like to use my images.

Disclosure

I am a participant in the Amazon Services LLC Associates Program, an affiliate advertising program designed to provide a means for me to earn fees by linking to Amazon.com and affiliated sites.

Footer

Sign up to get access to free sewing patterns & resource library!

Instagram post 2195172816769213754_232207174 Need a quick handmade gift? I just decided to run a sale on the North Pond Notebook cover pattern because it’s one of my favorite gift patterns!

The pattern includes printable pieces for composition notebook and journal sized covers, plus instructions for adjusting the size.

It looks awesome in lightweight waxed canvas or in your favorite floral. Click the profile link and then shop sewing patterns to find it.
Instagram post 2191506267319459831_232207174 These patterns for the #christmasartchallenge are for “snow” & “red”. The plaid ended up more pink than red for color balance, but I’m loving how this collection is coming together!

What do you think...festive notepads?

Thanks for organizing this @smcnabstudio 😊

#christmasartcountdown2019 #adventchallenge #instagramchallenge #holidaychallenge #procreate #procreatepattern #surfacepatterndesign #retrochristmaspattern #vintagechristmasdesign #artlicensing #stationerydesign #fieldofficesupply #surfacedesigntribe
Instagram post 2190280279549834279_232207174 Today’s prompt for the #christmasartcountdown with @smcnabstudio is “light”. I’m normally a white lights girl, but for a festive Christmas design I thought some retro colored lights would be fun!

I even made a gift wrap mock-up and coordinating ribbon design. What do you think...would you use gift wrap like this?

#christmasartcountdown2019 #adventchallenge #instagramchallenge #holidaychallenge #procreate #procreatepattern #surfacepatterndesign #retrochristmaspattern #vintagechristmasdesign #artlicensing #giftwrapdesign #christmasartchallenge 
#surfacepatterndesigner #wrappingpaperdesign #surfacedesigntribe
Instagram post 2190116868090358075_232207174 I’m participating in @smcnabstudio ‘s #christmasartcountdown this year. 
Yesterday’s prompt was “jolly”. I initially thought “tis the season to be jolly”, but ended up using another line from Deck the Halls for this design.

May your homes be filled with joyous song!

#christmasartcountdown2019
Instagram post 2190108615864385513_232207174 Patterns on sale! 🙌🏻 I’ve been working hard to get some other design work done, but I wanted to offer a discount on all patterns to thank you for following along!

Use code “cyberthanks” to get 30% off all sewing patterns. The potholders and notebook covers are great for quick gifts!

I’m thankful for all if you and pray you have a holiday season filled with love & joy! 😊
Instagram post 2186548202094497241_232207174 We’re stuck inside with the rain today, but we’re hoping for some nice weather this weekend. One of Thanksgiving traditions is a family hike!

Time in nature and away from the screens always provides inspiration and motivation to be creative.

#optoutside #optoutsideeveryday #familyhike #happycreative #surfacepatternlife #designerinspiration #thanksgivingtraditions #dukegardens #slowlivinginthecity #seekthesimplicity
Instagram post 2164095073994453782_232207174 I finally designed my own phone case!

This is my 3rd case from @society6 but I have always loved designs from other designers better than anything I designed myself. (The latest two were both from @patbravodesign 💕) This time I used one of my own designs and it just makes me happy. 😊 I know I have really found my signature style this year and I’m hoping to find time to put together a full surface design portfolio by the end of this year. And maybe a fabric collection someday...for my sewing friends 🙌🏻 #society6 #surfacepatterndesigner
Instagram post 2141433828682452245_232207174 I’ve been sketching a lot of bouquets lately, including the one in the pattern in my last post. This little bouquet seemed right for a housewarming card!

Do you still give paper cards to people? I haven’t as much since I got busy with little kids, but sending cards is a practice I’d love to add back in my life.

It seems like the gesture might mean even more to people now that it is more rare to get a handwritten note. 📝

#fieldofficemockups
Follow on Instagram
  • Disclosures & Copyright
  • About
  • Contact me!
  • Digital Pattern FAQ’s

Copyright © 2019 · Sara Curtis // beloved theme