• SHOP
  • About
    • About Sara
    • Contact me!
    • Design Collaborations
    • Sewing Collaborations
  • Sewing
    • Sewing Tutorials
    • Things I Made
  • Design Portfolio
  • Blog
  • Nav Social Menu

    • Facebook
    • Instagram
    • Pinterest
Radiant Home Studio | Sewing Patterns & Surface Design

Radiant Home Studio

January 23, 2015 ·

Learn to Sew a Cargo Pocket for a Tote Bag

Tutorials

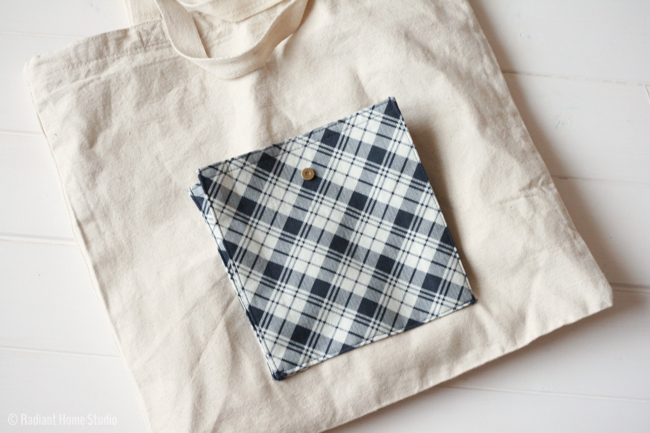
Anyone else love pockets? Let’s sew cargo pocket with a magnetic snap flap on to a tote bag!

Sew a Cargo Pocket to a Tote Bag | Tote Bag Upgrade | Radiant Home Studio

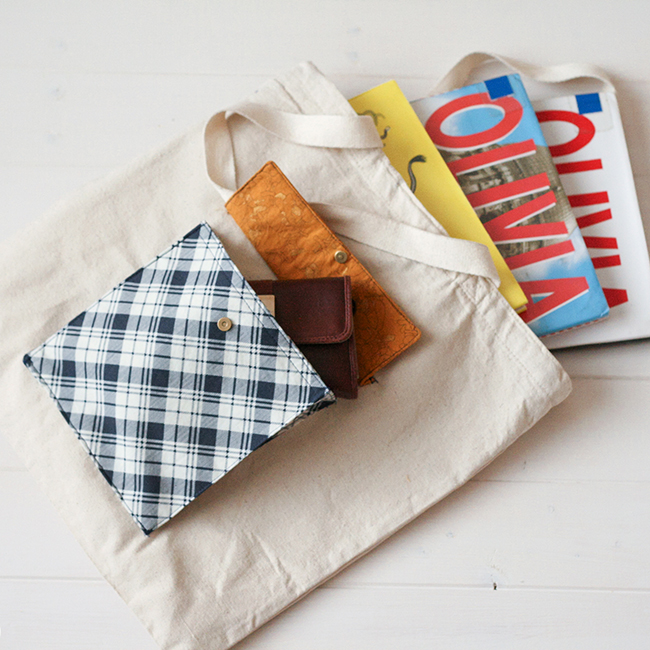
Not only are pockets useful, but they are also a great way to add some color and style to a plain tote bag. This pocket also includes a magnetic snap closure. If you haven’t worked with magnetic snaps before, this is an easy first project. It’s very low risk in terms of the amount of fabric you need and the amount of time you’ll invest.

(This post contains affiliate links, which means I make a small commission at no cost to you. Thanks!)

The materials listed below are estimates. Pockets are a great way to use up fabric scraps, so check and see what you have before you go and buy new fabric!

Materials:

  • 1 or 2 fat quarters of cotton fabric (Grab a second fat quarter or use some scraps if you prefer a contrast on the flap or inside the pocket.)
  • 1 magnetic snap set (Size is not a big concern. This is what I used.)
  • about 1/2 yd. of mid-weight interfacing (I use Pellon 931 or SF101.)
  • matching thread

Sew a Cargo Pocket for a Tote Bag:

1. For the main pocket piece, cut out 2 rectangles, 12″ x 8″. For the pocket flap, cut out 2 rectangles, 8″ x 4″.

Add a Cargo Pocket to a Tote Bag | Tote Bag Upgrade | Radiant Home Studio

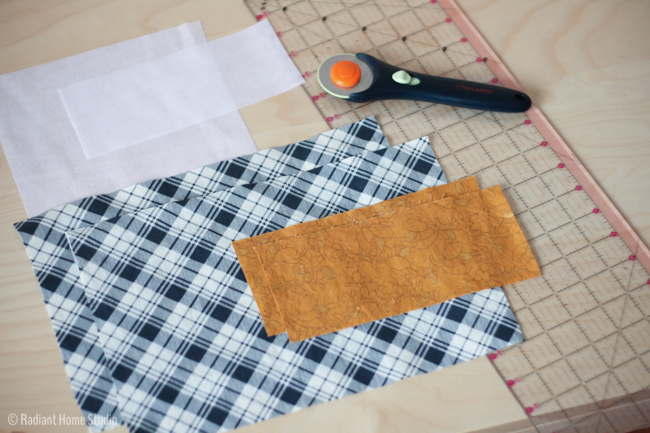
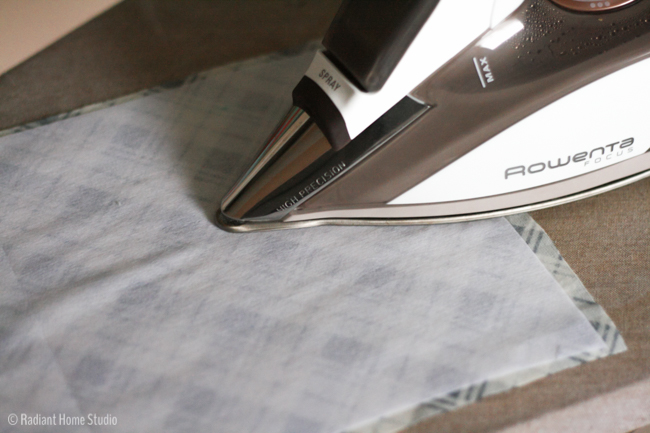
2. Fuse interfacing to 1 main pocket piece and both pocket flaps. (There should be directions included with it. Choose a medium weight like Pellon 931 or SF101.)

Add a Cargo Pocket to a Tote Bag | Tote Bag Upgrade | Radiant Home Studio

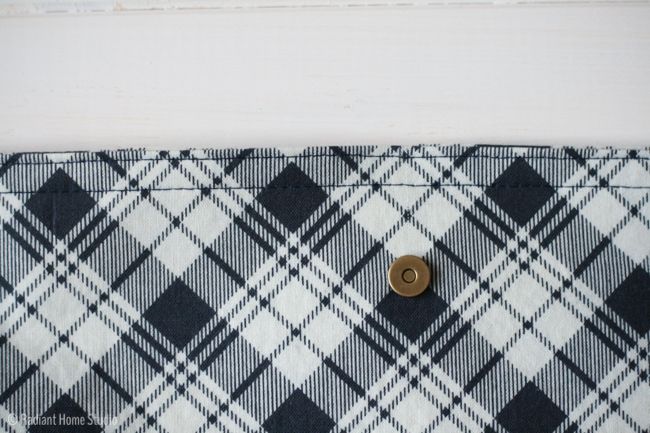
3. Apply magnetic snaps to the interfaced pocket piece, and one of the pocket flaps. For the pocket piece, place the male snap centered across the width and 1 1/2″ from one of the long edges. For the main pocket piece, place the female snap centered across the width and 1 1/2″ from one of the long edges. (These snaps from Amazon are like the ones I used.)

Add a Cargo Pocket to a Tote Bag | Radiant Home Studio

4. Place the large rectangles right sides together. Stitch around the rectangle with 1/2″ seam allowances, leaving a 3-4″ opening near the snap to turn the fabric right side out. It’s best to start stitching on a long straight side (as opposed to the corner).

Add a Cargo Pocket to a Tote Bag | Tote Bag Upgrade | Radiant Home Studio

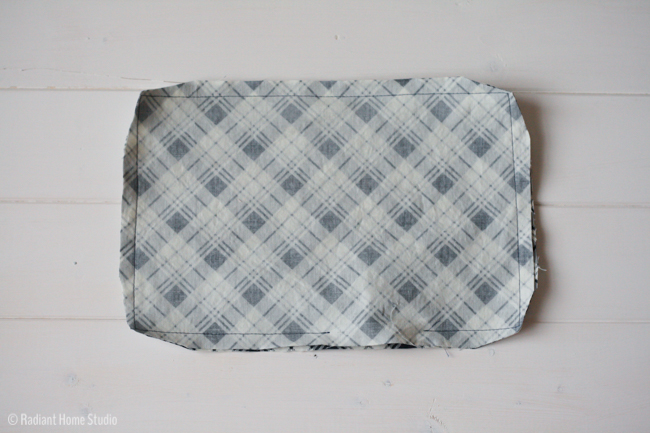
5. Trim the corners and seam allowances. Turn the rectangle right side out through the opening, push out the corners, and press. Tuck in the raw edges at the opening and press those so that they are even.

Add a Cargo Pocket to a Tote Bag | Tote Bag Upgrade | Radiant Home Studio

6. Topstitch at 1/8″ along the edge with the snap. Topstitch another line 1/4″ below that. (You may need to use your zipper foot if you get close to the snap.)

Trim the corners and seam allowances. Turn the rectangle right side out through the opening, push out the corners, and press. Tuck in the raw edges at the opening and press those so that they are even.

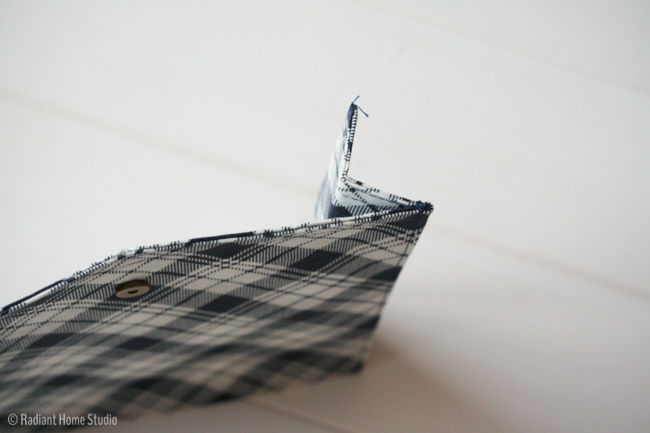
7. Measure and mark the fold lines at 1″ and 2″ from each of the short sides.

Add a Cargo Pocket to a Tote Bag | Tote Bag Upgrade | Radiant Home Studio

8. Fold the fabric toward the pocket lining (the side without the snap) at the 2″ marks and press. Topstitch along the fold lines at 1/8″.

Add a Cargo Pocket to a Tote Bag | Tote Bag Upgrade | Radiant Home Studio

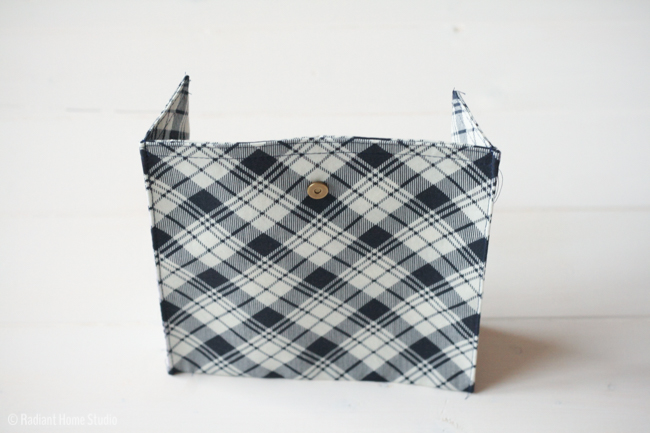
9. Fold and press at the 1″ markings, so that you have a “z”-shaped fold.

Add a Cargo Pocket to a Tote Bag | Tote Bag Upgrade | Radiant Home Studio

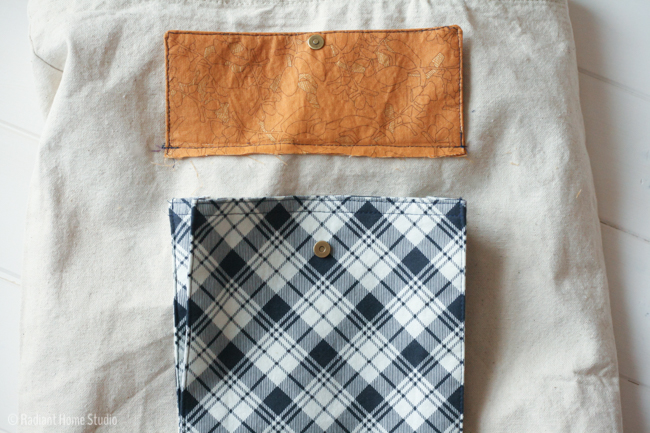
10. Place the pocket on your canvas bag, centered across the width and 2″ from the bottom. Tuck the folded edges under the pocket, so that it is flat, and pin in place.

Add a Cargo Pocket to a Tote Bag | Tote Bag Upgrade | Radiant Home Studio

11. Topstitch the short sides onto one side of the tote bag, through the lower pocket layer only.

Add a Cargo Pocket to a Tote Bag | Tote Bag Upgrade | Radiant Home Studio

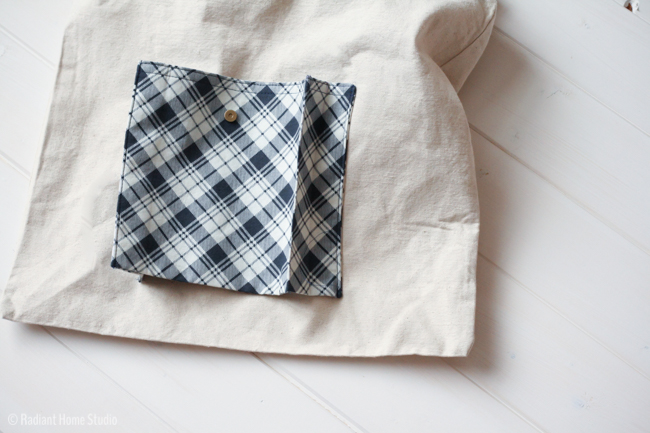
12. Topstitch along the bottom of the pocket through all pocket layers and one side of the tote bag. (It can be tricky to get the bag positioned. You’ll have to push a lot of fabric under the presser foot and readjust it often to keep the straps and back of the bag from getting caught in the stitching.)

Add a Cargo Pocket to a Tote Bag | Tote Bag Upgrade | Radiant Home Studio

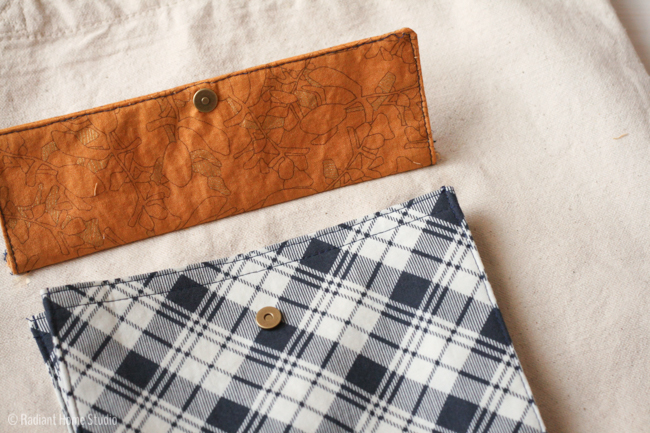
13. Let’s make the flap! Place the flap pieces right sides together and stitch on 3 sides, leaving the long side without the snap open. Trim the corners, turn it right side out, and press. Topstitch around the 3 sides at 1/8″. (Use the zipper foot again to get around the snap if needed.) Fold and press the raw edge of the pocket flap toward the side with the snap, 1/4″.

Add a Cargo Pocket to a Tote Bag | Tote Bag Upgrade | Radiant Home Studio

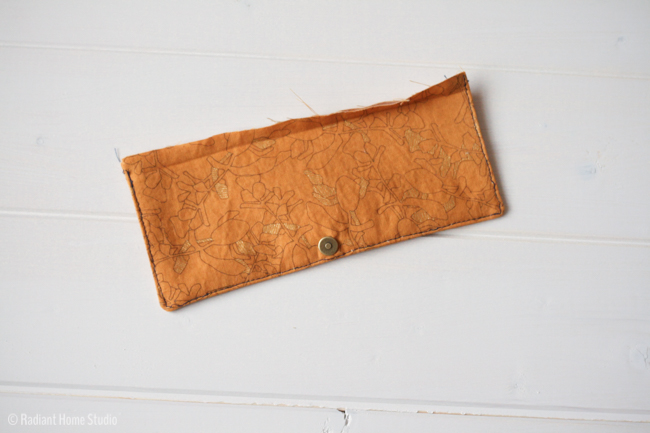
14. Snap the flap to the pocket and mark the place where the folded top edge of the pocket flap meets the bag.

Add a Cargo Pocket to a Tote Bag | Tote Bag Upgrade | Radiant Home Studio

15. Unsnap the flap and fold it up as though it were opened. Match the fold to the marks you just made and stitch it in place.

Unsnap the flap and fold it up as though it were opened. Match the fold to the marks you just made and stitch it in place.

16. Fold and press the pocket flap down. Topstitch along the top edge at 1/8″ and again at 1/4″ below that. (This is just below the raw edge that is under it so that the raw edge will be concealed when you open the flap.)

Add a Cargo Pocket to a Tote Bag | Tote Bag Upgrade | Radiant Home Studio

Don’t be intimidated by the number of steps! With practice, you can add a pocket like this in 15-20 min. Once you master the basic pocket, you can branch out and try different closures (hook-and-loop tape, buttons, or other latches) or trims (add some lace or use bias tape on the flap). You could even try making a patchwork pocket to use up those smaller scraps. Be creative and make it your own!

Sew a Cargo Pocket to a Tote Bag | Tote Bag Upgrade | Radiant Home Studio

Also, don’t miss the first Tote Bag Upgrade post: 2 Ways to Add a Lining to a Tote Bag

Previous Post: « 2 Ways to Add a Lining to a Tote Bag {Tote Bag Upgrade}
Next Post: 5 Tips to Help Fix a Bag Lining That is Too Big! »

Reader Interactions

Comments

  1. Teresa says

    January 23, 2015 at 12:44 pm

    Cute! I love a good cargo pocket….and pockets on bags, the more the merrier!

    • Sara Curtis says

      January 23, 2015 at 12:45 pm

      Thank you Teresa!

  2. Ruth says

    January 24, 2015 at 5:37 am

    What a neat cargo pocket! A simple way of getting a nice deep pocket. Thank you for the tip!

    • Sara Curtis says

      January 24, 2015 at 12:39 pm

      Thank you! I hope you find it useful 🙂

  3. vicky myers says

    January 24, 2015 at 12:53 pm

    I love the pleats in the pocket to add depth, and the fact you have used different fabrics:)

    • Sara Curtis says

      January 24, 2015 at 1:11 pm

      Thank you Vicky! I could see this as a great way to use scraps of coordinating quilting fabrics. You could even use different fabrics for the linings to make it really colorful and fun.

  4. Lorena says

    January 25, 2015 at 4:24 am

    Another wonderful tutorial, this kind of pocket are very useful, and you make it look so easy to sew

  5. Krista says

    March 8, 2015 at 2:27 pm

    Hi! I’ve been wanting to use one of these totebag upgrade tutorials, and this past weekend the opportunity came to do so. I made a cargo pocket for a totebag lining and customized the shape of the flap, making it curved. It worked out very well, and I was pleased with how it turned out.

    Thank you for all of these lovely tutorials!

    • Sara Curtis says

      March 9, 2015 at 12:11 pm

      I’d love to see it! Tag me on social media if you post it 🙂

  6. Marina Barnard says

    May 13, 2015 at 5:05 am

    Hi love the pocket, however how to I proceed to make the same fold on the bottom side of the pocket? I have tried but its a bit messy! Greetings, Marina

    • Sara Curtis says

      May 13, 2015 at 8:38 am

      It would be too bulky to make a bottom fold with this method. The best directions I have for the type of cargo pocket you want are in the Oliver + S Cargo Pants pattern. Basically, you make the folds and cut out squares from the bottom corners to the first fold lines. Then you need to stitch in the corners to make the pocket corners. Maybe try this tutorial…

      • Marina Barnard says

        May 14, 2015 at 8:19 am

        Thank you so much, this works like a bom! I have made these pockets on a “bush wacking” bag and it looks amazing.

        Regards,

        Marina

  7. Christie says

    February 14, 2016 at 4:08 am

    What a wonderful up-grade. Giving a face-palm…why didn’t I think of that before??? I have many tote bags to add pockets to, this will make them so much more useful. Thank you for sharing. Blessings.

    • Sara Curtis says

      February 17, 2016 at 7:53 am

      Glad it was helpful!

  8. Sandhya says

    February 14, 2016 at 10:17 am

    Very useful and a tutorial very nicely done.

    • Sara Curtis says

      February 17, 2016 at 7:53 am

      Thank you!

Primary Sidebar

Hello

Welcome! I’m Sara. I share modern home & accessory sewing patterns, and I create surface designs for licensing. I hope you are encouraged to see beauty in small things and are inspired to try new creative projects!

Shop Sewing Patterns


icon icon

icon icon

Newsletter

Sign up to get access to free sewing patterns & resource library!

Find My Work at:


© Copyright Notice

All images and text copyright ©2013-2020 Radiant Home Studio, unless otherwise noted. Please be kind enough to link back to my site and contact me if you would like to use my images.

Disclosure

I am a participant in the Amazon Services LLC Associates Program, an affiliate advertising program designed to provide a means for me to earn fees by linking to Amazon.com and affiliated sites.

  • Disclosures & Copyright
  • About
  • Contact me!
  • Digital Pattern FAQ’s

Resources I Love:


Featured Posts:

  • How to Make A Waxed Canvas Gift Pouch | Radiant Home Studio

    How to Make a Waxed Canvas Gift Pouch

Sewing Tutorials

Denim Pocket with Grommets and Denim Shoulder Strap| Tote Bag Upgrade | Radiant Home Studio

Sewing Patterns

Surface Design

home page 1 - radiant home studio design
Sara Curtis | Stationery & Pattern Design

overflowandco

🪴Shop welcoming greeting cards, stationery, home goods, & gifts in NC
☕️ Cozy, fresh, encouraging design
💌 Email for wholesale, licensing & collabs👇🏻

I’ve been spending my creative energy gardening I’ve been spending my creative energy gardening this year. The previous owner planted gorgeous peonies that we get to enjoy every year. This year, the rain came at just the right time and they are thriving. #peonies #peoniesofinstagram #flowergarden #flowergardensofinstagram
I still have sewing patterns in my Etsy shop! The I still have sewing patterns in my Etsy shop! The potholder pattern always gets popular before the holidays because people love to make beautiful custom gifts for their friends and family. 

#sewersgonnasew #sewingproject #sewinggifts #diygifts #christmassewing #giftsforfriends #handmadegifts #handmadegiftsarethebest #etsyshop #sewingpattern
I’ve finished my Masters in Autism Studies! I’ I’ve finished my Masters in Autism Studies! I’m providing parent coaching, education and consultation services to families. If you know anyone that might benefit from my services, please send them my way! @autistickind
It’s been a while, but I’m taking my products It’s been a while, but I’m taking my products to a market in April! If you’re in the Triangle area, stop by 🌸Petals & Play: a Celebration of Neurodiversity on April 20th. #petalsandplaydurham @hopecreekacademy for more details…

#durhamevents #raleighnc #durhamnc #chapelhillnc #artisanmarket #stationeryshop
Stock up on encouraging greeting cards! 50% off ev Stock up on encouraging greeting cards! 50% off everything this week when you support my favorite nonprofit @hopecreekacademy 🙌

DM me for the code if you donate!

#givingtuesday2023 #giveback #shoplocal #shopsmall #shoplocaldurhamnc #shopsmallraleigh #stationeryshop #handmadegiftshop #coffeecard #friendshipgift #greetingcardshop
Grab a bunch of stocking stuffers for up to 50% of Grab a bunch of stocking stuffers for up to 50% off! This year I’m supporting @hopecreekacademy - a nonprofit school for neurodivergent students. This school has been a lifeline for our family this year and Eve been volunteering all we can to help them meet the needs of the students. When you donate to their fundraiser, l’ll send you a coupon code for 50% off your purchase of everything in my shop! 

#shopsmalldurham #shopsmallnc #shoplocalnc #stationeryshop #sewingpatternshop #washitapelove #washitapeshop #stockingstuffers #supportnonprofits #giveback #givingtuesday2023
Load More Follow on Instagram
  • Disclosures & Copyright
  • About
  • Contact me!
  • Digital Pattern FAQ’s

Copyright © 2025 · Sara Curtis // beloved theme