I had this idea that jeans are the hardest type of garment to sew. What about you? It seems so impressive somehow. We say things like, “She even makes her own jeans!!” as if it’s the pinnacle of sewing achievement. After making the Baste & Gather Birkin Flares, I’m wondering why everyone is so intimidated by making them. Here’s a little Birkin Flares Review!
Lauren deserves a lot of credit for writing a great pattern, of course. She’s been saying all along that jeans are easy. I wasn’t convinced, but it’s true! I have a little bit of fitting to do for my next pair, which complicates things. But the actual construction? Not any harder than my Retro Rucksack.
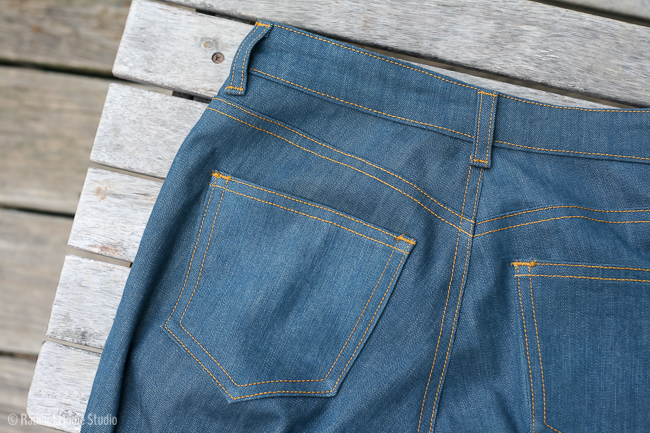
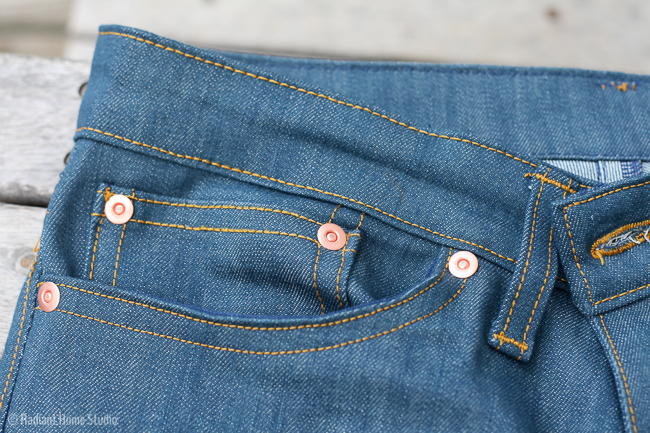
The Birkin Flares pattern is excellent – well-written, lots of tips for first-time jeans makers, and a great fit. I made my jeans in just 2 afternoons. Honestly, I’ve spent longer shopping for jeans that fit. I had a couple of moments where I was confused, but overall the pattern went together as easily as any basic pants pattern. The only real difference is the topstitching and rivets. Maybe this is weird, but I love topstitching. I know some people can’t stand the precision it requires, but I enjoy it. And rivets are easy. If you have used magnetic snaps or grommets, rivets aren’t much different. (And if you are still worried, Lauren includes a video link explaining how to install them.)
Denim was surprisingly easy to sew. I’ve been using knits and specialty fabrics more lately and the sturdy cotton was a welcome change. My machine does well on thick fabrics. I regularly sew through more layers while I’m making bags. But I think that even a basic machine would be able to handle the denim. Lauren has great tips for the thick spots (including hammering the corners flat before sewing…). The inside seams of the jeans will look most professional if serged, but you can probably get away with using an overlock or wide zigzag stitch if you don’t have a serger.
My fabric is stretch denim. I found it at fabric.com, but it’s no longer available. Try Mood Fabrics for high-quality options. The weight and stretch of this denim is perfect for these jeans, and the price is great. I’m a little less excited about the color. It almost has a slight greenish tint to it. The picture online makes it look a bit darker than it is in real life. It looks like many jeans I’ve seen in the store, but I prefer something slightly darker and a little more grayish. If you like medium color denim though, this is a pretty good choice for the price.
I used the recommended hardware from Taylor Tailor. They arrived quickly, were reasonably priced, and installed easily. And I still have enough left for another pair. I used Gutermann topstitching thread in the classic gold color. I decided to stick to classic colors this time, but I think next time I’ll try a natural color for topstitching. The gold stands out a little bit more than I like. Not a huge deal, but I thought I’d mention it.
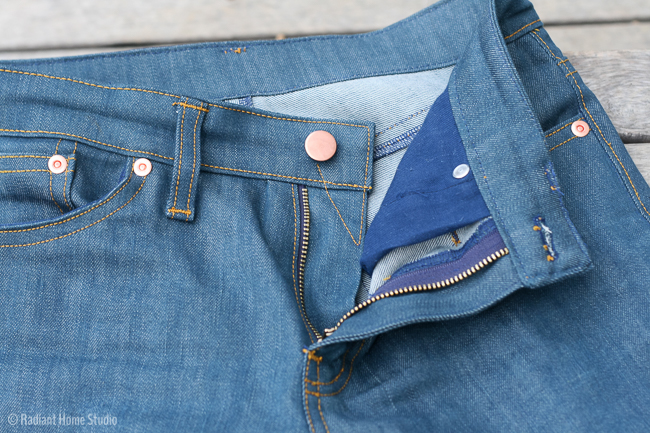
I also wanted to include a photo of the zipper opened up. I had to work through this part of the pattern with just the illustration for guidance, and it took a little bit of figuring out. The illustration totally makes sense now. I was probably tired at this point. I looked at my store-bought jeans a lot for help, but I still wasn’t sure that I was doing the right thing without seeing the finished picture. I stepped away, thought about it, and then it made sense when I came back. So, for anyone else that might be looking for a photo to help with the fly construction…
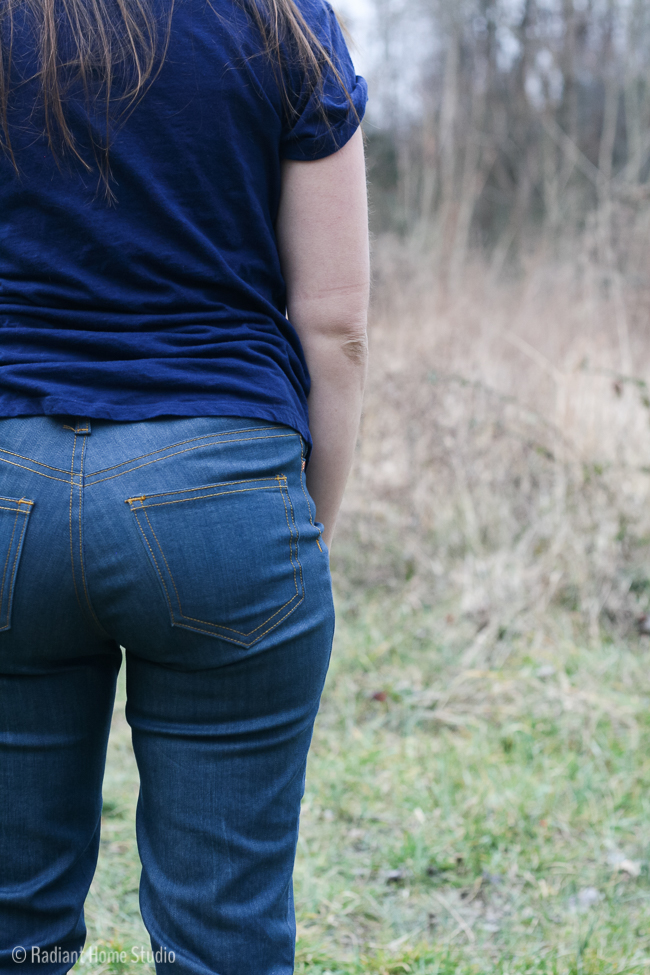
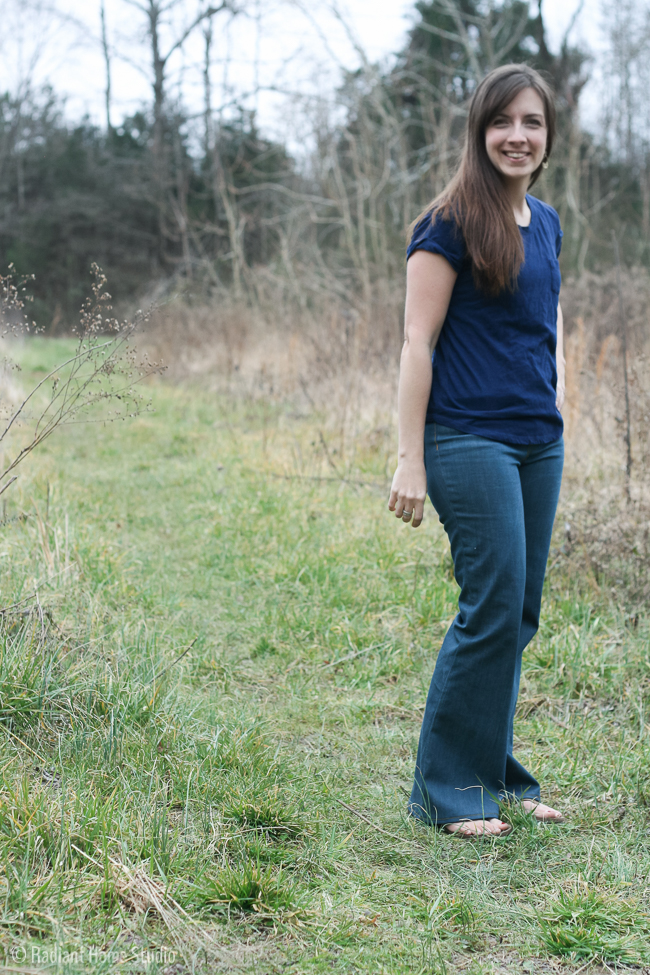
So, let’s talk about fit. Since this is my first pair, I’m considering them a wearable muslin. I didn’t splurge on the really nice fabric since I wasn’t sure how it would go. I’ll definitely be making another pair, but I’ll need to make some fit adjustments. Though I measured correctly and I think I chose the best size, there is still pulling around my lower hips and upper thighs. (I made a size 28. My measurements are right on for this size.) This is a common problem for me with store-bought jeans too, so it isn’t unexpected that these need adjusting as well. My plan is to try a full butt adjustment (though I wish it was called something else!). Basically, I need to add a little to the center back seam, raise the top edge of the back leg pieces, and adjust the back upper thigh a little. This should reduce the wrinkling in the front hips and back thigh. I will report back after I try this…
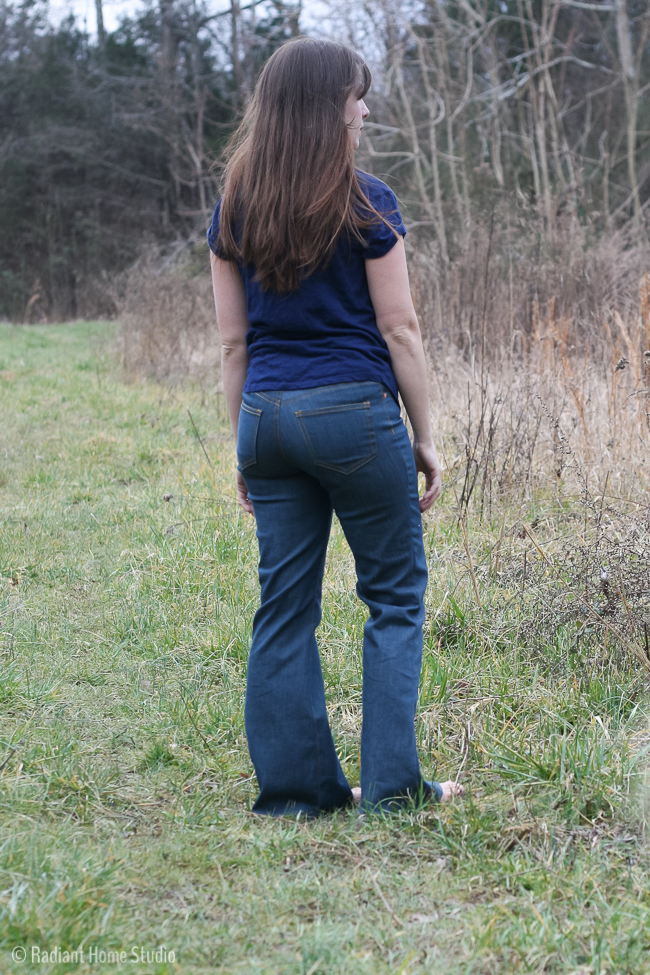
As I said, these fit as well as most of my store-bought jeans, so I’ll definitely be wearing them. Any top that hangs down to my hips will be fine. I just won’t wear them with anything tucked in or belted. Overall, I consider this a successful experiment. I feel confident sewing my own jeans now. I know I can get the fit right with a little bit of work, and custom fit jeans will be worth the time and energy spent. I’m also looking forward to the skinny jean option that will be released in a few weeks!
Update on my Birkin Flares Review: I’ve been wearing my jeans for two days and the denim is stretching and fitting the shape of my body better. In fact, I think I need to go down a size in the waist now. These are feeling loose compared to my store-bought jeans. My alteration plans have changed. I think I may start with a size 27 and make the full butt adjustment from there. I’m going to keep wearing these and wash them a couple of times before I make any final decisions though. Moral of the story: if your jeans don’t fit quite right or seem tight, try wearing them around for a while and see what happens…
And if you have any scrap denim, try this fun tote bag upgrade!

You look great in them! I agree the construction isn’t as complicated as expected, but my old machine really struggled with the denim. However, I just finished the skinny version in a thinner stretch denim and that went considerably better. Definitely more to follow 🙂
Thank you Nienke! I’m glad you made them work with the thinner denim. Mine was 9 oz. I think, so probably on the lighter side. Can’t wait to see your skinny version!
Thanks, it’s on my blog now! It doesn’t help with sewing heavy fabric that my machine has been declared beyond repair, it’s completely worn out… Heavy user 😉 But a new one is looming on the horizon!
Those turned out really well! I was looking forward to seeing how they turned out. Love them!!
Thanks Jayme! The details are great. I don’t think most people would be able to tell they are handmade.
They look great, and the fitting issues are minimal. I’m sure your next pair will be even better. Why won’t you wear them with a tucked in shirt?
Thank you! I left out the most unflattering shots of the waist. There fit issues are worse at the top where a shirt covers it. I also got my button too far over and there is some gaping at the top of the zipper. Minor issues that I will resolve next time, but I don’t feel comfortable drawing attention to it by tucking in my shirt.
I just finished mine!! Your not the only one who loves topstitching, it was my favorite part!!! 🙂
Yay! Other people have been confessing their love of topstitching too. Now I don’t feel so crazy! 🙂
Thanks for such a detail post about these jeans and the sewing journey to achieve such a great fitting pair of flares. I have been sewing forever and have stayed away from the jean making that seems to be on everyone’s sewing machine. I have decided to take the plunge as I love the flares and cannot find any in my petite size at the moment. Look for forward to seeing your next pair with fitting tweaks.
Good luck! I’m sure with a little work you can make yours fit the way you want!
They look great and I’ll be anxious to see how your alterations turn out. They do start to mold to your body after wearing a bit and the fit changes – better I think! It’s a strange phenomenon we discussed in the tester group too! I had a crisis with fitting while making mine but I talked myself down from the ledge and now that they’re done I love mine. I might try some adjustments later this year…we’ll see! Anyway – GREAT JOB – yours look great!
I think it’s something you just have to figure out by experimenting. It is scary to try on pants that are so tight while you are making them. They definitely get better with wear. It seems like the best way to figure out the sizing is just to make a wearable muslin and wear them around for a while to get a feel for how they fit. I’m wondering how the Cone Mills denim compares. I assume it’s similar. Anyway, thanks for your thoughts and compliments!
These are amazing!! I’m waaaaay off trying to make my own pair, but you’ve inspired me to at least think about it a bit more!
Thanks for sharing – I’m not convinced my machine would cope with the denim. I’m not a girl who does flares so great to hear that a skinny fit is coming:)
What a beautiful jeans! I just bought the pattern after another blog convinced me, so now I’m looking all over the internet to find more reviews before I will start my own 🙂 but still I look forward to it, your pair and your explanation are great! Thank you!!
Thank you! I did the same thing! I’m hoping to make another pair soon with a couple of modifications and in a darker color. Good luck with yours. It will feel like a great accomplishment when you finish 🙂