• SHOP
  • About
    • About Sara
    • Contact me!
    • Design Collaborations
    • Sewing Collaborations
  • Sewing
    • Sewing Tutorials
    • Things I Made
  • Design Portfolio
  • Blog
  • Nav Social Menu

    • Facebook
    • Instagram
    • Pinterest
Radiant Home Studio

Radiant Home Studio

May 13, 2016 ·

How to Make a Waxed Canvas Retro Rucksack

Patterns· Sewing

I’m excited to finally share this new waxed canvas Retro Rucksack with you! I made this weeks ago, but didn’t have the time to photograph it and get the pattern updated until this week.

Waxed Canvas Retro Rucksack | Radiant Home Studio

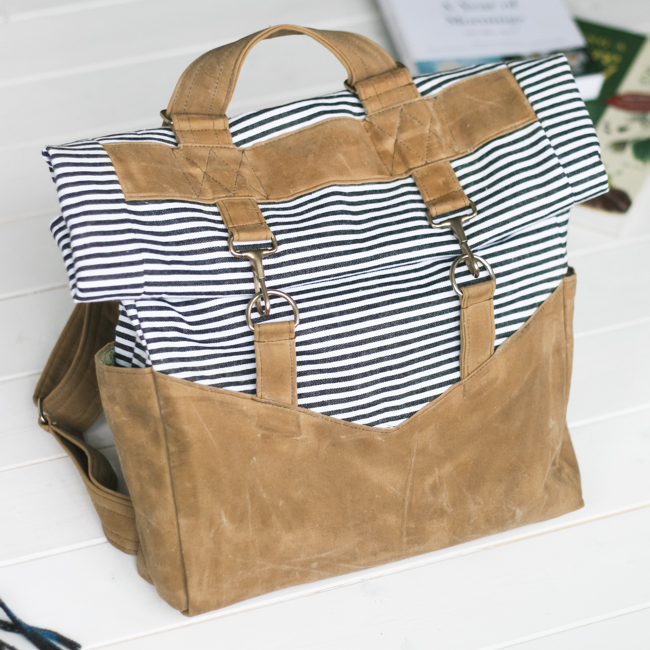
Ever since I made a waxed canvas messenger bag for my husband, I knew I wanted to use some for my Retro Rucksack. If you haven’t used waxed canvas for bags before, I highly recommend it! The wax protects the fabric from dirt and moisture, so it’s perfect for bag bottoms. It has the look of beautifully aged leather when it is finished, and it continues to look great after use.

I have more information about how I use Otter Wax to coat my canvas in this post. I used about half of a large bar of wax for this bag. Different fabric absorbs more or less wax, so the amount can vary…but at least that gives you an idea.

I prefer to wax after I finish sewing. It saves wax because you aren’t waxing the parts that will be caught in the seam allowances. It also brings out the character of the bag as you rub the wax in and accentuate the folds of the fabric. And you can finish sewing the bag all in one sitting instead of waiting for waxed pieces to dry in between.

If waxing sounds like too much effort, you can also find pre-waxed canvas on Etsy.

Waxed Canvas Retro Rucksack | Radiant Home Studio

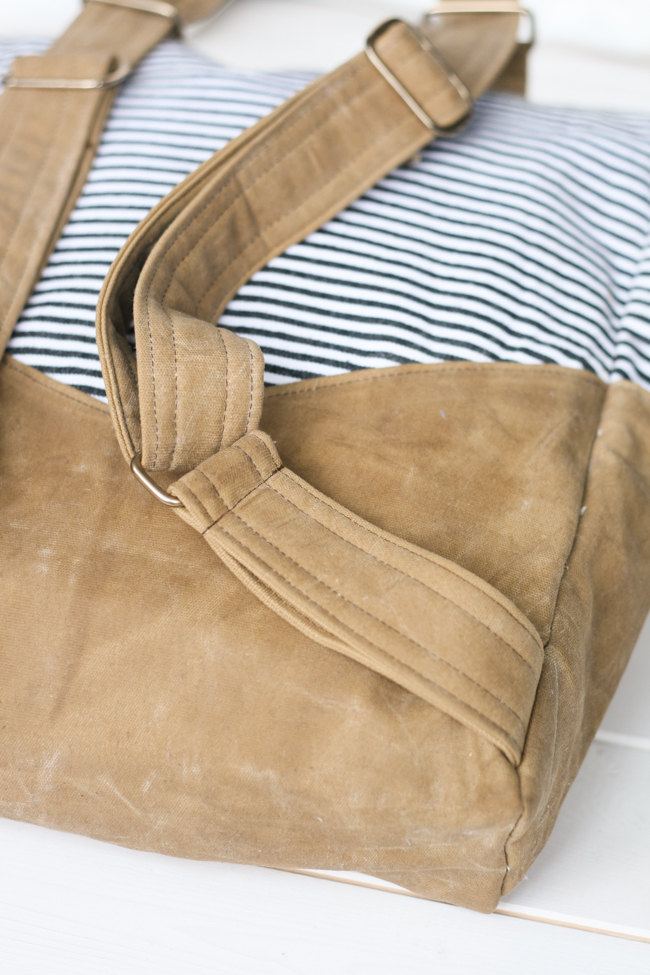
For this pattern, I made all of my straps and added the wax after doing all of the topstitching and pressing, but before sewing them into the bag. I waxed the bottom accent pieces and top strap band after completing the bag. If you aren’t planning to wax the whole bag, you can protect the other fabric by using masking tape or painters tape along the edges.

Retro Rucksack Sewing Pattern | Radiant Home Studio

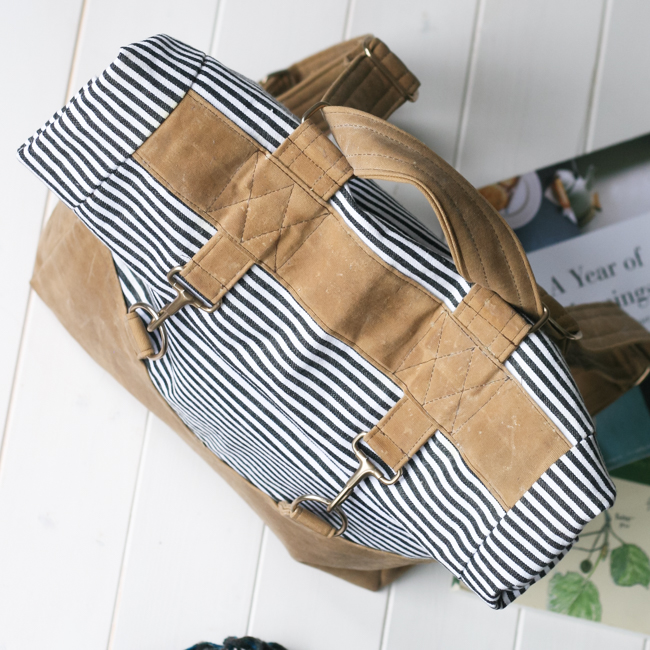
A few months ago, I updated the Retro Rucksack pattern to include a roll-top option in addition to the recessed zipper option. This version shows how the roll-top looks. I’ve also updated the pattern listing with these new photos and I have included a preview of one of the pattern instruction pages. Check out the new pattern listing for more information!

Retro Rucksack Sewing Pattern | Radiant Home Studio

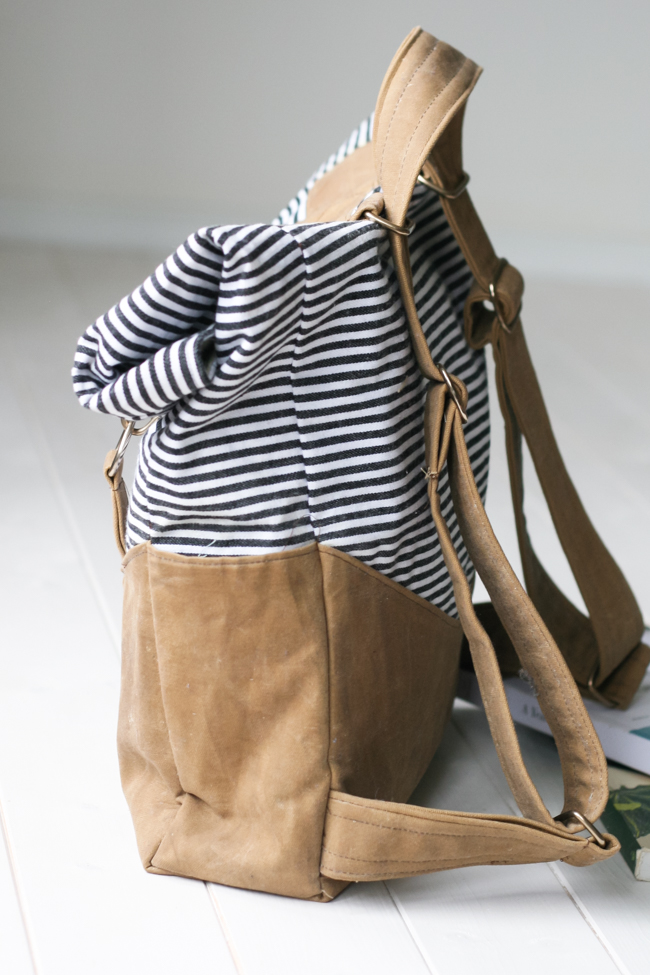
Here, you can see how the strap converts from a backpack to shoulder strap. You can wear it as a backpack, or as a cross body style bag. And there’s actually a third option that I use, which is the short shoulder strap you get when you leave the strap adjusters in this position.

Retro Rucksack Sewing Pattern | Radiant Home Studio

I really love how this came together with the waxed canvas! I hope it inspires you to try sewing the Retro Rucksack or to use waxed canvas in your other bag projects!

SaveSave

Previous Post: « Felt Tutti Fruity Penny Pincher
Next Post: Best Notebooks to Fit Your Notebook Cover »

Reader Interactions

Comments

  1. Jess Abbott says

    May 13, 2016 at 9:55 am

    Gah! I had just pinned this already this morning, and here I see it in the Blog reading list. I LOVE IT!!! So so pretty, I would rock this bad boy all day every day! So awesome!

    • Sara Curtis says

      May 13, 2016 at 10:32 am

      Thank you so much! I’m finally learning that I prefer solids and basic print fabrics for bags…and waxed canvas is the best material for bags!

  2. Olga Becket says

    May 14, 2016 at 10:54 am

    What??? I had no idea you could wax your own fabric!! This is soo cool! Love love the bag!

    • Sara Curtis says

      May 14, 2016 at 10:56 am

      Once you get started…you won’t be able to stop! 🙂

  3. Chloe says

    October 28, 2016 at 6:38 pm

    I love this bag! And waxing your own fabric – Magic!
    I am yet to adventure into this canvas territory and would love to know if my everyday Janome machine can handle this thicker fabric? What machine do you have at home?

    • Sara Curtis says

      October 30, 2016 at 2:34 pm

      Yes! it’s hard to find, so making your own is a great option. I use a mid-grade Pfaff. It’s not a starter machine, but it’s not the most expensive model either. I think with the right needle it should be fine. You can always wax after you sew if you are worried about it.

Primary Sidebar

Hello

Welcome! I’m Sara. I share modern home & accessory sewing patterns, and I create surface designs for licensing. I hope you are encouraged to see beauty in small things and are inspired to try new creative projects!

Shop Sewing Patterns


icon icon

icon icon

Newsletter

Sign up to get access to free sewing patterns & resource library!

Find My Work at:


© Copyright Notice

All images and text copyright ©2013-2020 Radiant Home Studio, unless otherwise noted. Please be kind enough to link back to my site and contact me if you would like to use my images.

Disclosure

I am a participant in the Amazon Services LLC Associates Program, an affiliate advertising program designed to provide a means for me to earn fees by linking to Amazon.com and affiliated sites.

Footer

Sign up to get access to free sewing patterns & resource library!

Favorite Adobe Illustrator tool? I love recoloring Favorite Adobe Illustrator tool? I love recoloring patterns. I probably spend way too much time with the recolor tool and not enough time making new patterns. 🤷🏻‍♀️

Last day to join the Immersion Course! If you have ever dreamed of making beautiful designs, Bonnie can teach you how to get what’s in your head into the computer and then how to make money from licensing your designs to companies for use on products. 

As a member of Bonnie’s support team, I’ll be there to make sure you don’t feel lost. There’s room for you...as Bonnie often reminds us!

#surfacepatterndesign #surfacepatterndesigner #surfacepatterncommunity #printandpattern #radianthomestudiopatterns #floralpattern #alltheflowers #artlicensing #flowersfordays #mutedflorals
Look what just came in the mail! Notebooks! This w Look what just came in the mail! Notebooks! This was a test batch to check quality and I’m thoroughly impressed.

I’ll be listing extra in the shop soon, but first dibs go to anyone that signs up for the Immersion Course using my link. I’ll be sending a small gift package and scheduling a course success/ coaching call with you!

Just a reminder that the last day to enroll in Immersion is tomorrow! If you are like me and overthink things until the last day, you are not alone. 

I know it’s a huge decision. I have an Immersion stories highlight if you want to know more or go to my profile to find a link to the info page. Message me all your questions! 

#immersioncourse #immersioncourse2021 #designernotebooks #learntodesign #learnillustrator #surfacepatterndesigner
Just got an order of stickers in! I’m debating a Just got an order of stickers in! I’m debating about putting them in the shop as a separate product or adding them to orders. I think I need a few more to make a pretty coordinating set! 🌹

Reminder: there’s still a couple more days to enroll in the Surface Pattern Design Immersion Course or the free mini-course from Bonnie! Links in my profile...as always. Keep messaging with questions! ☺️
It’s been a minute since I showed my face here! It’s been a minute since I showed my face here! ☺️

I wanted to get a little personal today. If you’re here for sewing & crafty stuff...stay tuned. I’m not abandoning you. 🙂 If you saw my stories last week, you may have learned that I’m deep in design mode for a few weeks, working with @bonniechristine on the Surface Pattern Design Immersion Course.

When I discovered Spoonflower (about 8 years ago!) and realized I could create my own fabric, I had this far off “maybe someday” dream to create a collection of designs for a fabric company.

I spent many years learning bits and pieces of design and business skills. But a couple of years ago I got more serious about making my dream a reality. 

Last year, I made an investment in myself and I joined the Immersion Course with Bonnie Christine. It was truly the community support and confidence that I gained that propelled me forward this year. Just a few weeks after Immersion ended I signed a licensing deal for children’s wall art with Oopsy Daisy and a few months after that...I signed a contract with a fabric company!

You guys...Bonnie is SO genuine and generous in everything she does. ❤️ It spills over into this beautiful and inspiring community that cheers each other on every step of the way. 

This year, Bonnie invited me to join her support team to help encourage new students through the course and provide technical support for all those tricky Illustrator issues. 🙌🏻

This course is for anyone that wants to invest in their creative career. My “wildest dream” came true this year. I’m actually feeling a bit lost right now because I need a bigger dream!

Whether you have a few years of experience like I did when I joined or you have never used design software...Bonnie will walk you through the ENTIRE process. This is like a college-level course on design and creative business. We have many older students starting a second career, people that just graduated design school but don’t know how to practically start an art-based business, and people from dozens of countries around the world. It’s a beautiful, diverse community filled with people taking steps toward their creative business goals.

More below...
We had our first day of fake spring yesterday. It We had our first day of fake spring yesterday. It was warm for one day and it’s back to being cold. 🤷🏻‍♀️

I always draw flowers anyway. I’m hoping some of the local botanical gardens open back up this year. We have some really great inspiration nearby and flowers will start blooming soon!

It’s the little bits of beauty that inspire me the most. What are you looking forward to this Spring?
Just a reminder that I have this heart garland tut Just a reminder that I have this heart garland tutorial linked in my profile if you want to make some happy Valentine’s decor this week.

My girls are origami experts, so we worked together on these video tutorials last year. It’s a good family project for older kids! 💕

#heartcrafts #valentinesdecor #valentinecrafts #mycolorfulhome #cozymodernvibe #diyvalentinesdecor
This another favorite pattern of mine. As my style This another favorite pattern of mine. As my style has developed, I’ve embraced the imperfect lines and tend to work with graphic, but organic shapes. I like unexpected little pops of color or shapes that emerge from layering.

My iPad is at the fix-it shop, so of course, I’m feeling inspired today. ☺️ Maybe I should try some actual sketching and planning on paper with a pencil...😜

#radianthomestudiodesign #fabricdesign #surfacepatterndesign #surfacepatterncommunity #surfacepatternlife #licensingartist #artlicensing
Remember last year, the girls and I made this cute Remember last year, the girls and I made this cute origami heart garland tutorial? ❤️💙💛🧡

I don’t usually decorate with themed stuff, but these are fun to make and add some joyful, non-tacky hearts around the house for Valentine’s Day. 💕 I popped the link in my profile buttons. There are videos in the blog posts too. 

Also, I shared some personal stuff in my stories today!

#origamigarland #origamiproject #valentinesdecor #valentinesgarland #valentinescrafts #origamiheart #origamihearts #papercrafts #heartcraft #happyhearts #joyfulhome #mycolorfulhome
Follow on Instagram
  • Disclosures & Copyright
  • About
  • Contact me!
  • Digital Pattern FAQ’s

Copyright © 2021 · Sara Curtis // beloved theme